Friday, December 25, 2009

Merry Christmas! My First (and only?!) Gingerbread House

The December 2009 Daring Bakers’ challenge was brought to you by Anna of Very Small Anna and Y of Lemonpi. They chose to challenge Daring Bakers’ everywhere to bake and assemble a gingerbread house from scratch. They chose recipes from Good Housekeeping and from The Great Scandinavian Baking Book as the challenge recipes. Thanks to Anna and Y for hosting this month's truly challenging project! I chose to use Y's recipe (the second one) as all the ingredients were on hand at my parent's house.

As usual I started this challenge by thoroughly reading the trials and tribulations of other Daring Bakers' and putting myself in a slight panic. Thus my devotion to sorting two movie size packs of Nerds (Thanks to Jarrett for his help with this tedious task) and various other candies by color in preparation rather than moving forward with baking and construction.

My initial plan was to go Gaudi in honor of visiting Spain this year, but when I began rolling the gingerbread at 11 a.m. Christmas Eve that went out the window. Procrastination never wins. As expected from my reading the dough crumbled, but rolling it between wax paper sheets forced it back together and all was well. Or it was well until I carefully cut out the front, back and sides of the house using Martha Stewart's Snow Swept Gingerbread Cottage template and stuck them in the oven only to realize the template lacked a roof! Needless to say I was none to happy and concerned about the likely dough shortage.

Fortunately my Dad was able to create a roof template, there was just enough dough using the scraps and a roof was made. I opted to "glue" the house together with the simple syrup, which Mom kindly made, because it would be quicker. Simple syrup worked like a charm creating a VERY sturdy house, although once something is set crooked it is SET. Sigh. Also, it is pretty dangerous. I burnt my finger, the roof of my mouth (genius!) and got syrup in my hair. This was around the time when I informed Mom that I thought I preferred cooking to baking. :)

The decorative gluing and snow are royal icing, made using the linked recipe and a touch of maple extract to improve the flavor without making the snow look dirty.While tasty the icing was like cement, which is the ultimate goal but not the instant one. My hands are sore today but somehow it all worked out and I was able to present the lovely house below to my family at our annual Christmas Eve gathering at Mom's parents.

My house may not be exactly what I envisioned but it wasn't a bad first try. I haven't decided if I'll tackle this again but maybe by next year I'll have recovered and be up for the challenge again. Gingerbread Houses like those of my fellow Daring Baker's can be beautiful and come in all shapes and sizes. It's hard to fail.

Wishing you a very Merry Christmas (or whatever you celebrate/celebrated) to you and your loved ones! If something in this entry doesn't make sense, please forgive me. I got a migraine for Christmas, in addition to fun gifts, and it is killing me.
 The finished project!
 Detail Shot
 See? It was very sturdy. 
And I was very sticky.

Y's Recipe: Scandinavian Gingerbread (Pepparkakstuga)
from The Great Scandinavian Baking Book by Beatrice Ojakangas 

Ingredients
1 cup butter, room temperature [226g]
1 cup brown sugar, well packed [220g]
2 tablespoons cinnamon*
4 teaspoons ground ginger*
3 teaspoons ground cloves*
2 teaspoons baking soda*
½ cup boiling water
5 cups all-purpose flour [675g]

Directions
1. In a large bowl, cream the butter and sugar until blended. Add the cinnamon, ginger and cloves. Mix the baking soda with the boiling water and add to the dough along with the flour. Mix to make a stiff dough. If necessary add more water, a tablespoon at a time. Chill 2 hours or overnight.
2. Cut patterns for the house, making patterns for the roof, front walls, gabled walls, chimney and door out of cardboard.
3. Roll the dough out on a large, ungreased baking sheet and place the patterns on the dough. Mark off the various pieces with a knife, but leave the pieces in place.
4. [I rolled out the dough on a floured bench, roughly 1/8 inch thick (which allows for fact that the dough puffs a little when baked), cut required shapes and transferred these to the baking sheet. Any scraps I saved and rerolled at the end.]
5. Preheat the oven to 375'F (190'C). Bake for 12 to 15 minutes until the cookie dough feels firm. After baking, again place the pattern on top of the gingerbread and trim the shapes, cutting the edges with a straight-edged knife. Leave to cool on the baking sheet.

*After my reading I halved all of these items. The resulting gingerbread didn't puff up enough to distort and wasn't overly potent to eat. It was a very dry, slightly sweet gingerbread which balanced nicely with the sweets and icing used to decorate.

Simple Syrup

Ingredients
2 cups (400g) sugar

Directions
Place in a small saucepan and heat until just boiling and the sugar dissolves. Dredge or brush the edges of the pieces to glue them together. If the syrup crystallizes, remake it.

Tuesday, December 22, 2009

Mushroom Bourguignon

Smitten Kitchen's Mushroom Bourguignon is a hearty, visually appealing dish. I served it to Leslie and Danielle a few Sundays ago with a spinach, red onion and bosc pear salad topped with a homemade lemon-feta-bsalmic vinaigrette and the leftover red wine as a one course meal.

Mushroom Bourguignon smells heavenly when cooking and as long as you aren't fastidious about your dicing, which of course I was, it is low maintenance to make though not particularly quick. I don't think I have ever before enjoyed portabellos as much as I did in this preparation. They are so juicy, tender and thick that they resembled yet trumped any stewed meat I've consumed.

My only change to the recipe was using Trader Joe's Low Fat Greek-Style Yogurt instead of Sour Cream to top it. When I enjoyed the one leftover portion the following day, I skipped the yogurt entirely as I didn't find it to make a significate difference to my palate. The fresh parsley garnish, however, is as must have. It adds a light note to an otherwise rich dish.

This was my first time using the dutch oven I purchased back in August (there was a bit of time involved in getting it from Va to NYC but thanks to Val, Vika, Rafe, my limited arm muscle and the MTA Transit system it arrived to my apartment) and I'm as happy with it as I thought I would be. I can't wait to try out other recipes where I can take advantage of its stovetop to oven functionality. It will be perfect for winter.

Wednesday, December 16, 2009

Quinoa Salad With Lime Ginger Dressing and Shrimp

I've actually made this Quinoa Salad With Lime Ginger Dressing and Shrimp twice now, an honor few recipes experience. It is a very delicate, Asian-inspired salad that makes me feel very healthy and satisfied when I eat it. Quinoa's crunch plays well against the firm yet soft texture of the shrimp while the cucumber refreshes your palate.

The first time I prepared the recipe exactly as instructed but found the dressing too slick on my lips, a very professional taste test, so I (approximately) halved the canola oil this time. This adjustment left the salad dressed enough for my taste and removed the unpleasant post-consumption texture. Cutting canola oil didn't have a noticeable effect on the flavor. Thank God because otherwise I'd probably be telling you how sick this dish made me, instead of suggesting that you make it next time you want a light, quick meal that is easy to assemble after work.

Just keep in mind it is very light. I can barely get 3 meals out of it, much less the 4 described in the recipe. In the future I'll plan on it being 2 servings, instead of trying to squeeze out three and ending up starving at the vending machine at work.

Sunday, December 13, 2009

Salmon en Croute

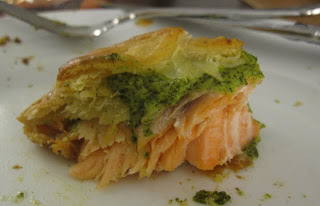
The 2009 Daring Cooks December challenge was hosted by Simone of Junglefrog Cooking. Simone chose Salmon en Croute (or alternative recipes for Beef Wellington or Vegetable en Croute) from Good Food Online. I'm glad she introduced me to this dish as Salmon en Croute is delicious, rich and relatively simple.

As usual it took me longer than the expected cooking time of 50 minutes to create thanks to pre-made puff pastry's unaccounted for thaw time and my relatively meticulous chopping of the red potatoes, bosc pears, carrots and onions I roasted to serve on the side. I'm pretty sure Rafe was ready to shoot me when we sat down to eat at 9:50 p.m. but I've also convinced myself that he, Vika and Demaris forgave me when they realized how tasty the creamy Salmon en Croute was.

I used watercress and spinach for the herb crepe and made the decorative cut outs by hand, which were pretty even if they didn't cover up the seam where the pastry shell joined together. Cooking salmon for 30 minutes made me skeptical, but it was very moist and flaky likely thanks to the puff pastry packet and herb crepe's protection.

Next time I make this, I will use smaller pieces of salmon and remember to reserve some of the herb mixture for a garnish because as you can see my salmon packets are oozing green goo (so not attractive). This would be a great dinner party dish accompanied by a fresh salad or something similar. Roasted vegetables went well but doing two things in the oven certainly didn't help with getting this to the table promptly.


Wednesday, December 9, 2009

Buttermilk Cookies with Lemon Zest and Lemon Glaze

These Buttermilk Cookies with Lemon Zest and Lemon Glaze are a reminder of the lightness and fun of summer, which is perfect as the bitter cold of winter has started here in NYC. They are petite, slightly sweet and full of citrus, especially if you choose to use a full lemon's zest and then add a tablespoon or so of fresh lemon juice to the glaze like I did. What? I didn't like the buttermilk-confectionery sugar glaze. It just tasted too much like sugar paste. The juice made the glaze lighter, more refreshing and the whole project less wasteful. Their texture is almost cake-like but slightly chewy.

I can tell you with confidence that no one minded all that lemon in the least. My co-worker, N, came back for seconds immediately and said they were amazing cookies and he is hard judge. Danielle said they were tasty, Jeff fully approved although he questioned my ability to cook as he always ends up testing sweets, and I ate, well, I don't want to tell you how many, but way too many of the 40 involved in the halved recipe Molly at Orangette provided on her blog adapted from the now closed Gourmet. These cookies make me feel like I really missed something with the whole Gourmet thing. Oh well. 

I can't wait to make these using grapefruit, much to most people's chagrin. I don't care. I'm doing it anyway (as soon as my self-imposed baking ban lifts). They will be delicious. An excellent lesson I learned about buttermilk this year, that enabled me to make these cookies on a whim to deal with dying lemons, is that you can freeze buttermilk! When defrosted and stirred it is as good as new.

Monday, December 7, 2009

Sesame-Garlic Soba Noodles with Fried Egg

A few Friday's ago I invited Meg over to eat dinner and to catch up on Gossip Girl, which we haven't been able to watch in a timely manner this year. Last year virtually every Monday night was spent on her couch enjoying the dramatic times and (mostly) fantastic wardrobes of those scandalous Upper East Siders. I'm not sure why fitting it in is so much harder this year, but a three hour viewing block wasn't exactly a bad thing on a dreary Friday.

For dinner I revisited this Sesame-Garlic Soba Noodles with a Fried Egg recipe and it was just as good the second time as the first. These noodles are easy, inexpensive, filling and feature sesame oil, my favorite. The sesame flavor and creamy yolk make the dish decadent, the red pepper's spiciness is a nice kick to the palate and the green onions add flavor and punch of color to an otherwise neutral looking dish. My only complaint is how sticky my soba noodles always get. Am I doing something wrong to have them end up gummed together - overcooking perhaps?

To add some texture and to be healthier by eating more veggies, I julienned rainbow carrots and sauteed/steamed them with snow peas and a touch more sesame oil just long enough enough to leave them crisp this time. They were a great addition, although getting OCD about the cutting certainly made this quick dish take longer.

This dish is feasible to make in advance and reheat. Last time I had an excessive amount of soba noodles, so I fried 3 more eggs and contentedly ate it for lunch most of the week. If you like Asian-inspired food, I recommend you try this recipe. If you are anything like me it will only leave you wanting more.


And with the delicious yolk oozing out to mingle...

Friday, November 27, 2009

Lemon, Garlic and Herb Roasted Chicken and Persian Sour Cherry Saffron Rice

Since attending my friend and sorority-grandma, Sheri's, 2005 wedding, I've been obsessed with Persian/Iranian rice dishes. I love their rich flavors and texture. "Marmalade" rice is my favorite but I have yet to find a recipe for it...possibly because no one else calls it marmalade rice. When I spotted Jaden of Steamy Kitchen's Persian Sour Cherry Saffron Rice Polow, almost equally as long ago, I knew I wanted to make it. It was just a matter of finding sour cherries in light syrup and the inspiration to take the time to do it.

This recipe isn't quick but is worth the time if you like buttery, slightly crispy cherry flavored rice (mine wasn't sour). I halved the recipe as I only need so much decadence daily. Or rather I halved everything except the butter and cooking time. Needless to say the rice was a bit darker than usual and dripping with butter. Edible but not ideal. I used a paper towel to soak up some of the butter and made the remainder of the basmati rice to mix with the polow so I didn't die from clogged arteries. I should have just stuck to the recipe. In case you decide to halve the recipe, hopefully with greater success, my 24-oz jar of sour cherries contained approximately 1 cup of juice and 2 cups of cherries.

I made Oregano-Lemon Chicken with roasted rainbow carrots and red onion last week and liked how little work was required for juicy, well browned chicken but found the result too sweet. So I adjusted the recipe for this week making it more savory and roasting the decorative lemon slices from carmelized to slightly burnt (oops). I enjoyed its equally rich flavor in contrast with the sweet rice. This is probably my favorite roasted chicken preparation to date.

The combined dishes were a little sinful, very flavorful and definitely will be kept in mind for future dinner parties or movie-food nights.

Oregano-Lemon Chicken
Adapted from Taste of Home via AllRecipes.com

Ingredients
6 chicken thighs
3 tablespoons lemon juice (1 whole lemon is plenty.)
Lemon Slices
1 tablespoon honey (I used Buckwheat, which I own because dark honey has more antioxidants than lighter honey per SuperFoodsRx.)
1 tablespoon olive oil
5 garlic cloves, minced
1.5 tablespoons rosemary, chopped finely
5 springs of oregano leaves plucked

Directions
1. Place the chicken in a greased 13-in. x 9-in. x 2-in. baking dish. Combine the lemon juice, honey and oil; pour half over over chicken.Sprinkle garlic, rosemary and oregano over chicken. Pour remaining marinate over top.
2. Bake, uncovered at 375 degrees F for 45 minutes or until a meat thermometer reads 180 degrees F and chicken juices run clear, basting occasionally with pan juices.

Tuesday, November 24, 2009

Pear Clafoutis with Mint and Bacon Crumbles

I have a mild obsession with clafoutis. It's so easy, light and delicious (if you use lowfat milk in place of heavy cream) that I want to eat it all the time. Thus the decision to attempt converting this pear clafoutis into last week's breakfast. There is a savory way to make it but I had to have this one. The pears were just so pretty and they are in season.

I convinced myself that adding 3 pieces of crumbled turkey bacon, 1 tablespoon of chopped mint and decreasing the sugar by a tablespoon would make it less dessert-like. That logic was as flawed as convincing myself that the boys I made out with repeatedly while drunk in college and I sort of dated. It doesn't work in reality but the fantasy is enjoyable while it lasts. 

This clafoutis presents beautifully and like Nicole at Baking Bites, who developed it, says would be excellent for brunch. I do think it could use less sugar though as the pears, or at least my Bosc pears, are already super sweet on their own. Maybe with more bacon and less sugar there is still hope for it being an acceptable breakfast option? Because every bite made me smile and feel like I was getting away with something and there has to be some merit to starting your day off with that feeling.

If you haven't sliced and cored pears before, I discovered the easiest method to remove the core while retaining the shape is to use a melon baller to scoop out the seeds and then pull out the fibers. Thank you, internet.

Thursday, November 19, 2009

Cupcake Tea at the Ritz-Carlton

A few weekends ago I enjoyed The Ritz-Carlton New York, Central Park's Cupcake Tea with Alpha Gamma Delta's New York City Junior Circle. It was a sweet, Sunday afternoon treat in their elegantly appointed Star Lounge. Since we ended up with a party of eight, instead of the fifteen (or so) originally planned for, the Ritz-Carlton's staff let us squeeze around one coffee table making it much easier to converse.

Cupcake Tea includes a pot of tea/non-alcoholic beverage and a pre-set seasonally selected collection of five small cupcakes per person. The moist cupcakes are beautifully presented with a generous amount of frosting, which varied by type of cupcake, and cute coordinated wrappers.

We had Red Velvet, Pistachio, Strawberry Shortcake, Valrhona Chocolate and Coconut Cream cupcakes. My favorite was the pistachio, which was less sweet, full-flavored and light. The Red Velvet also impressed me - it didn't taste like food coloring and the sweetness was cut by a traditional cream cheese frosting. I liked their cakes better than the frostings, which all left a film on my lips.

While receiving five cupcakes makes this is a good deal, they were overwhelming to consume in one sitting. What I didn't realize was they will pack up the leftovers for you to take home... I recommend that and considering milk as your beverage of choice. My Pear Green tea was light and delicious but combined with cupcakes created a stomachache that wouldn't quit.

To make your life and the staff's lives easier, I would recommend Cupcake Tea for parties of 5 or less. Make sure to allocate a generous amount of time to enjoy the sweets and a leisurely chat. The Ritz-Carlton staff does not rush, which is both good and bad. 

Location: 50 Central Park West (at Avenue of the Americas)
Hours: Sat and Sun 11-2p, Reservations required
Cost: $$ ($25 per person plus tax and gratuity.)


It was a very full table but the Ritz-Carlton's staff made it work.


I loved the cupcake wrapper in the middle! Too cute.

Tuesday, November 17, 2009

Celery, Date and Feta Salad

After seeing abundant celery stalks for a great price at the Greenmarket, I knew I had to make something with them. When I stumbled on this Celery, Date and Feta Salad I decided it was fate. Especially exciting was its use of celery leaves, which I usually throw away - embarrassingly wasteful but true, and delicious dates, my obsession since Spain.

As usual it seemed simple enough based on the ingredient list, the only part I read before shopping; it probably is if you are an expert at de-ribbing celery, something the recipe implies you can do with a knife. Maybe if you are a professional. Every time I worked a rib loose and started to pull the rib broke. Celery ribs are a little smaller in diameter than wax-coated dental floss and they don't stand up to tugging as well as dental floss does... I've never loved flossing and de-ribbing celery wasn't ranking much higher on my list of things I like to do.

My frustration led me to YouTube, thank God,where I waded through some videos and learned a quicker method. Basically, you take the stalk of celery and bend it in half with the curve facing away from you until you see the ribs pulling apart and it starts to snap. Then gently and firmly pull one half downward. This will pull out lots of the ribs at once! The results likely are not as pretty as the suggested mysterious knife method, but it gets the job done creating the curls on my cutting board pictured below.

This salad is a delicious salty-sweet mixture with lots of crunch thanks to the celery. It's too much work for everyday eating and it certainly doesn't hold up well for leftovers, but it would be fantastic for a meal with guests. Should I make it for guests, I will probably decrease the dressing's oil a bit as I'm not fond of my lips feeling slick after eating salad and reserve the feta to top each serving and improve the presentation. If I am overambitious, which happens all the time with food, and make it for myself again I'll remember to keep the dressing on the side and dress each portion when I plan to eat it.

Saturday, November 14, 2009

Dragon Roll, Decorative Spiral Sushi and Nigiri Sushi

The November 2009 Daring Cooks challenge was brought to you and me by Audax of Audax Artifex and Rose of The Bite Me Kitchen. They chose sushi as the challenge.

I made sushi randomly a few times in 2003 but had not revisited it since unless I was eating out or if someone else (i.e. a Valentine one year) was making it for me. Without Audax and Rose's challenge and very impressive PDF containing detailed instructions with thorough research and visuals (it can be downloaded here) I doubt my bamboo mats and wooden spoons ever would have seen the light of day again.

Sushi is tasty but unless you are an expert it requires a bit of time. I advise dedicating several hours to this project as it isn't as short one. I started at 6 pm on Sunday and finished around 11:30 pm. I also recommend doing this as a sushi party or having friends over for dinner; I made way too much food for one person and while the leftovers are allright sushi is clearly better fresh!

It was very excited to learn how to make spiral rolls (so many possibilities here) and dragon rolls (my favorite)! The dragon roll video, which I watched after cutting my avocado length-wise rather than horizontally post-split, is very helpful. Next time I make dragon rolls, I'll cut the avocado more thinly and in the proper direction, but I made it work with the thicker cuts I had already made. It really goes to show that sushi is flexible and has lots of room for creativity.

My spiral roll used tuna, red pepper, cucumber and persimmon. In the future, I will definitely bulk up the fillings and be more experimental. I've seen some beautiful, non-fish versions from other Daring Cooks and in a few days you'll probably be able to a slideshow of everyone's work over on The Daring Kitchen website.

Wednesday, November 11, 2009

Graffiti

I'm a lazy blogger but when a restaurant is as good as Graffiti I have to commit to post. Last weekend Vika and Rafe treated me to two amazing belated birthday celebrations: dinner at Graffiti and hiking to Anthony's Nose in Bear Mountain, NY.

Grafitti takes your typical intimate NYC restaurant and shrinks it even further. Table of 4 elsewhere? Here it seats two couples and my party of three. Think your kitchen is small? Try orchestrating a whole dining experiences in a galley kitchen so narrow that the bathroom behind it has no choice but to place the sink behind the toilet. But it is a little bit of heaven.

Once the chef, who also served as host, carefully arranged us at the table and took our orders, he and his female counterpart were friendly, efficient and provided detailed descriptions (i.e. sweet, crunch, spice, etc.) of what each dishes’ different elements added to the overall flavor when presenting the food. The cuisine is innovative, Indian-inspired and served family-style for easy sharing.

We started with the Green Mango Paneer, a savory, spicy serving of cheese cubes accompanied by soft flat bread rectangles that tasted of anise. Vika ordered the Chili Pork Dumplings with Grapefruit Confit. The dumplings were delicate and juicy topped with tiny crisps of chickpea flour; I couldn’t taste the grapefruit outright but the dumplings were slightly sweet.

Next was the Zucchini Hummus Pizza, creamy and light on a puff pastry base with a kick from an unexpected topping of wasabi peas. Thanks to my obsession with “sea marshmallows” we had the Pickled Ginger Scallops with Candied Red Chili after that. They were thinly sliced and topped with spicy, sweet ginger and crunchy lentils for a contrast. For me, the ginger overwhelmed the scallops’ flavor at times but they were cooked perfectly.

Our entrees were the Cumin Eggplant Buns with a Thyme Fennel Relish and the Graffitti Burger, Garlic Fingerling Potatoes and Chipotle Mayonnaise. The buns were creamy with a melt-in-your-mouth savory, warm filling complemented by the fennel relish’s cooling crunch. The flavored lingered nicely on my palate. The Graffiti Burger was spicy and succulent flavored with anise, cumin and a mint relish that I couldn’t taste. It was probably my least favorite dish (still good!), especially since the fries prompted a discussion of the oil used rather than their flavor.

We tried all three desserts: Coconut Macaroons with Dulce de Leche, Warm Truffle Almond Strawberries with Pepper Ice Cream and a Hazelnut Chocolate Caviar Cupcake with Chocolate Chip Ice Cream. The macaroons were very hot and tastier than I remembered with just a hint of Dulce de Leche. The strawberries were most inventive and managed to please my palate, in spite of truffle meaning truffle oil, which for some reason reminds me of feet. My favorite was rich, warm chocolate cupcake topped with crispy caviar. It was simple and satisfying. All of the desserts were a sweet, but not too sweet finish to a great meal.

I highly recommend this restaurant. They accommodate vegetarian and gluten-free diets per their menu, so you have nothing to stop you. Reservations are recommended. Thanks Melanie and Eric for the recommendation!

Location: 224 East 10th Street (between 2nd and 1st Avenues)
Hours: Sun and Tues 5:30-10:30p, Wed-Sat 5:30-11:45p
Cost: $$


Photo courtesy of Vika: She, Rafe and I at the top of Anthony's Nose

Saturday, November 7, 2009

Spiced Pumpkin, Lentil and Goat Cheese Salad

When I saw this beautifully photographed blog entry featuring Spiced Pumpkin, Lentil and Goat Cheese Salad I knew I had to make it. Its ingredients were perfect for the cooling weather and it had a perfect autumnal appearance.

Working with an entire pumpkin intimidated me, even though I've hacked my way through cubing and peeling butternut, acorn and other squashes. My memories of arduous pumpkin carving with my sorority turned out to be greatly exaggerated, at least in the face of my more recent experiences cutting squash. It turns out (sugar) pumpkin is MUCH easier to cut than squash. So don't be afraid to try making this at home.

With the exception of the smoky flavor, which apparently is key and what I bought a brand new special kind of paprika for from Whole Foods, I love this dish. It is creamy, salty, sweet and slightly bitter in one fell swoop, meaning it manages to satisfy every possible craving I can have at once while still being healthy. My only changes were using wild arugula and tossing the pumpkin seeds in the leftover oil, paprika, salt, etc. mixture, roasting them in the oven for the last 10-ish minutes and topping the salad with them for added crunch.

N.b. You can get the special smoked paprika from the Fruit Exchange (cash only) in Chelsea Market for $1.50 in a plastic tub instead of paying around $5.00 for the cute, hot pink tin at Whole Foods. I need to remember that place is the best deal for spice purchases!

Thursday, November 5, 2009

Peach Mupcakes with Mascarpone Frosting/Cointreau-Peach Buttercream

On September 9, Leslie posted about our Spain planning/Ratatouille viewing where she served Thomas Keller's very delicious and complex Ratatouille recipe and I brought Peach Mupcakes with Mascarpone Frosting or Cointreau-Peach Buttercream. These mupcakes are a delicious adaptation of the Mango Chile Cupcakes with Key Lime Frosting from April's movie night. All 8 tasters agreed.

Clearly the recipe is out of season but I suspect using frozen peaches would work and two orange events were last weekend, Halloween and the ING NYC marathon, making it kind of timely. The cupcakes are moist, light and not overly sweet. Mascarpone Frosting** lets the cupcakes flavor shine without being overly sweet. Unfortunately it quickly disintegrates in heat (or if you overbeat it) thus the Cointreau-Peach Buttercream. The buttercream was a result of my not having milk and decided on a whim to substitute the two handy liquids. It was exciting to discover that buttercream doesn't have to be restricted to milk, butter, confectionary sugar and extracts.

I highly recommend making these cupcakes and your own variations. I'm thinking my next batch should be apples/apple cider and a maple or brown butter frosting.

Peach Mupcakes

Ingredients:
1 cup flour
3/4 cup sugar
6 tablespoons butter, at room temperature (I used salted and it was fine).
3/4 cup soy milk, at room temperature (any milk would work)
1/4 cup peach nectar, at room temperature
2 teaspoons baking powder
1/2 teaspoon salt
1/8 tsp nutmeg
1/4 tsp cinnamon
1 egg, at room temperature
3 peaches, blanched, peeled and cut into cubes*

Directions:
Preheat oven to 350. Line or grease and flour 12 wells in a cupcake pan. In a large bowl, cream the butter and sugar. Add the egg, mix thoroughly. Add flour, baking powder, nutmeg, cinnamon, and salt to the butter mixture. Add the milk and peach nectar to the rest of the batter and beat until well combined. Fold in peaches. Fill each well 2/3 of the way full. Bake about 15 minutes or until a toothpick inserted the center of a cupcake comes out mostly clean. Cool briefly in the pan, then remove cupcakes to wire racks to cool completely before icing. Ice.

*Bring water to a boil. Cut a cross into the bottom of the peaches. Add to boiling water for 5 minutes. Drain. Peel as soon as you can handle them.

**I forgot to bookmark which recipe I used for the marscapone frosting, but I'm sure you can findn a good one via the every useful Food Blog Search to the right.

Molly's piping skill! It was my first time using the pastry bag...harder than it looks...but not bad.

Wednesday, October 28, 2009

Spaghetti Squash and Chard Gratin

Cooking lulls me into complacency; it makes me focus only on what I'm doing, which is great as I'm notorious for over analyzing. Unfortunately this means there are problematic cooking time warps where "suddenly" it is 12:30 am, I have to be up by 7 am, and my adapted version Spaghetti Squash and Chard Gratin is still cooking.

I suspect part of the issue may be that I confuse simple vs. quick recipes. This gratin is really simple to put together but there are numerous steps and longer cooking times, so it takes a few hours and is not quick.

It isn't pretty but this dish is worth the time as long as you can handle the slightly stringy texture of spaghetti squash. It is creamy, warm and filling yet still healthy! I found myself eating portions for breakfast all week as it reminded me of a crustless quiche for some reason. I loved that Kalyn added Swiss Chard as I always mean to eat it but haven't acquired a taste for it.

Spaghetti Squash and Chard Gratin
(Makes about 6 servings, recipe created by Kalyn with inspiration from Spaghetti Squash Gratin at Daily Unadventures in Cooking.)

1 large spaghetti squash (mine was 2.5 lbs)
1 T + 1 T olive oil
2 tsp. Rosemary Garlic Rub, or any all purpose seasoning that's good on vegetables
2 tsp. garlic powder and a sprinkle of salt
1 large onion, diced small
1/2 tsp. Spike seasoning (optional but good)
1/2 tsp. dried thyme leaves
1 tsp. Italian Seasoning
fresh ground black pepper to taste
1 T minced garlic (or less)
12-16 oz. chopped chard leaves (about 5-6 cups chopped chard, you could also use other greens like spinach, collards, or kale. The cooking times might be longer for some greens.)
2 T finely chopped fresh chives or sliced green onion
1/2 cup low fat sour cream (don't use fat free)
1/2 cup 2% greek yogurt
3/4 cup low fat cottage cheese curds (put the cottage cheese in a fine strainer and rinse with cold water to get the cheese curds)
1/2 cup coarsely grated Parmesan cheese plus about 1/4 cup more for topping the gratin
1 egg, beaten

Preheat oven to 400F/200C. Wash the outside of the spaghetti squash if needed, then cut off the stem and blossom end, stand squash upright, and using a large chef's knife, carefully cut in half lengthwise. Use a sharp spoon to scrape out seeds and the slimy material that surrounds them, and discard. Rub cut sides of squash with about 1/2 T olive oil for each half, then sprinkle each with 1 tsp. Garlic Powder and a bit of salt. Spray the roasting pan with non-stick spray, Put squash on baking sheet and pour 1/4 cup water around bottom of squash. Roast squash about 45-50 minutes, or until it separates easy into strands when pulled with a fork. Let squash cool for a few minutes, then shred into spaghetti-like strands.

While squash cooks, wash chard leaves if needed and spin dry or dry with paper towel. In two batches, stack up chard leaves on top of each other and slice into thin ribbons, then turn the cutting the board the other way and slice again into small pieces. Chop onion.

Heat 1 T olive oil in heavy frying pan, add chopped onions, season with Italian seasoning and black pepper, and saute until onion is softened, about 2-3 minutes. Add minced garlic and cook about 1 minute more, then add chopped chard all at once. Cook chard about 1-2 minutes, turning a few times. until it's wilted to about half the size it was. (The chard shouldn't be completely cooked, since it will cook more in the gratin.) Turn off heat.

Put 3/4 cup low fat cottage cheese in a fine strainer and rinse with cold water until only the cheese curds remain, then let drain. Spray a glass or crockery gratin dish with non-stick spray or olive oil.

Using a large fork, gently mix the chopped chives or green onion and shredded spaghetti squash into the onion/chard mixture. Combine the greek yogurt, drained cottage cheese curds, Parmesan cheese, and beaten egg and mix into the chard/spaghetti squash mixture. Then put the combined ingredients into the gratin dish, and press down so it's evenly distributed in the dish. Sprinkle top with about 1/4 cup more Parmesan cheese.

Bake about 30-35 minutes, or until the mixture is bubbling and cheese is browned on top. Serve hot.


Tuesday, October 27, 2009

Macarons 2 Ways

The 2009 October Daring Bakers’ challenge was brought to us by Ami S. She chose macarons from Claudia Fleming’s The Last Course: The Desserts of Gramercy Tavern as the challenge recipe. Macarons were definitely a challenge. After reading and re-reading other people's trials, tribulations, tips and successes I made two batches with pretty good results.

The first batch were plain Almond Macarons with White Chocolate-Blueberry Ganache. I found them overwhelmingly sweet and could only eat one every few hours, which may make this the perfect dessert for me. Nevermind that I spaced the timing out by eating one with breakfast and one after dinner.

I was a little more adventurous with the second batch and attempted to create Coconut-Almond Macarons by processing then drying coconut. The coconut still felt kind of oily, so I didn't add much to the macronage and as as result the flavor was barely there. To make up for it I added the leftover coconut and some coconut extract to the Lime Curd I used for the filling. These macarons were less sweet (yay!), but I need to keep trying fillings as Coconut-Lime Curd was too oozy to hold the shape.

To summarize all the tips for your attempts, the keys to success are supposed to be: aging your egg whites a few days to remove some of the liquid, having them at room temperature, beating the whites to soft peaks adding sugar and beating the mixture to very stiff peaks again before adding the confectionery sugar/almond flour, deflating the mixture satisfactorily and then layering your baking pans and cooking on their bottom side. Be careful with that last step, baking pans are no longer easy to remove from the oven when used upside down.

Once I finish eating the new dozen, which I'm happy to share if you live nearby, I'm all ready to go on a macaron tour of NY to try some professional ones for comparison's sake. Who's in?

Claudia Fleming’s Macarons
(reduced to use 2 egg whites thanks to Audax Artifex…this makes approximately 12 macarons)

Ingredients
.75 cup and 2.5 tspns Confectionery Sugar
.75 cup and 2.5 tspns Almond Flour (I used Trader Joe’s almond meal and sifted a few times)
2.5 tspns Granulated Sugar (superfine/castor is ideal)
2 Egg Whites (room temperature)

Directions:
1. Preheat the oven to 200°F (93°C). Combine the confectioners’ sugar and almond flour in a medium bowl. If grinding your own nuts, combine nuts and a cup of confectioners’ sugar in the bowl of a food processor and grind until nuts are very fine and powdery.
2. Beat the egg whites in the clean dry bowl of a stand mixer until they hold soft peaks. Slowly add the granulated sugar and beat until the mixture holds stiff peaks.
3. Sift a third of the almond flour mixture into the meringue and fold gently to combine. If you are planning on adding zest or other flavorings to the batter, now is the time. Sift in the remaining almond flour in two batches. Be gentle! Don’t overfold, but fully incorporate your ingredients.
4. Spoon the mixture into a pastry bag fitted with a plain half-inch tip (Ateco #806). You can also use a Ziploc bag with a corner cut off. It’s easiest to fill your bag if you stand it up in a tall glass and fold the top down before spooning in the batter.
5. Pipe one-inch-sized (2.5 cm) mounds of batter onto baking sheets lined with nonstick liners (or parchment paper).
6. Bake the macaroon for 5 minutes. Remove the pan from the oven and raise the temperature to 375°F (190°C). Once the oven is up to temperature, put the pans back in the oven and bake for an additional 7 to 8 minutes, or lightly colored.
7. Cool on a rack before filling.

Piped and Ready (Batch 1)

Finished without too much sticking to the parchment paper!

The guts! They have feet, which is another sign of some success.
A trio of super-sweet treats!Batch 2

Friday, October 16, 2009

Chocolate Caramel Shortbread Bars i.e. Twix

I saw this homemade Chocolate Caramel Shortbread a month ago and vowed to make it after Spain and once I had people to share the bars with... After all I love Twix and the recipe looked pretty simple. Last Tuesday I decided Carielle's Friday birthday gathering would be the perfect opportunity.

It should have been easy. Shortbread is a cake walk with the mini-food processor. Melting chocolate, even in the microwave like I did, is a no brainer. And I've made caramel before with success. Unfortunately this recipe had me cursing the stove (the first time in 3 years my rooommate has ever heard this happen apparently).

For reasons I can't determine my caramel went very wrong; it was a bubbling mass topped with separated butter that greased my entire oven top while I frantically tried to get the whole thing to congeal into a usable state. In the end I poured off the butter and managed to salvage a tasty, though slightly overchewy, mass of caramel for the bars. Not ideal.

Luckily the bars still tasted decadent and delicious, especially if I let them come to room temperature for about 4 hours. When I revisit the recipe I plan to sub a different caramel recipe for layer 2 - a normal one that uses a candy thermometer. These bars are worth a try but be cautious. If you figure out how to NOT screw up the caramel please let me know and, oh, don't cut the bars until they are room temperature or the chocolate will crack.

Chocolate Caramel Shortbread (from the same blog but not the one she made)
Makes 12

½ cup butter, plus extra for greasing
Generous 1 cup all purpose flour
Generous ¼ cup superfine sugar

Filling and topping
¾ cup butter
Generous ½ cup superfine sugar
3 tbsp dark corn syrup
14 oz/400 g canned sweetened condensed milk
7 oz/200 g semisweet chocolate, broken into pieces

Preheat the oven to 350°F/180°C. Grease a 9-inch/23-cm square, shallow cake pan and line the bottom with parchment paper.

Place the butter, flour, and sugar in a food processor and process until it starts to bind together. Press into the prepared pan and level the top. Bake in the preheated oven for 20-25 minutes, or until golden.

Meanwhile, make the filling. Place the butter, sugar, corn syrup, and condensed milk in a heavy-bottom saucepan. Heat gently until the sugar has dissolved. Bring to a boil, then reduce the heat and let simmer for 6-8 minutes, stirring until very thick. Pour over the shortbread and let chill in the refrigerator for 2 hours, or until firm.

Place the chocolate in a heatproof bowl. Set over a saucepan of gently simmering water and stir until melted. Let cool slightly, then spread over the caramel. Let chill In the refrigerator for 2 hours, or until set. Cut the shortbread into 12 pieces and serve.

Wednesday, October 14, 2009

Vietnamese Chicken Pho a.k.a. "Pho Ga"

Last month immediately before Spain I took the plunge and signed up for The Daring Kitchen Challenges...Making Vietnamese Chicken Pho a.k.a. "Pho Ga" was my first project. The October 2009 Daring Cooks’ challenge was brought to us by Jaden of the blog Steamy Kitchen. The recipes are from her new cookbook, The Steamy Kitchen Cookbook.

For me Pho's golden broth is a soothing elixir that helps ward off colds, soothes hangovers and temporarily cures minor troubles like heartache. It brings back dozens of car rides to Pho So 1 in Jim's 3,000 GT during college. I always eat it with way too much S'richa, by accident, so my nose runs endlessly throughout the meal. Charming, I know.

Making Pho was exciting and intimidating, even if I didn't go with the made from scratch option. The biggest obstacle for me was finding star anise; I went to TEN grocery stores on Saturday and finally tracked it down at Eli's Vinegar Factory. After all that effort, I felt strongly that the Pho should taste like liquid gold. The end result was quite good and I think my ability to prepare it can only improve. My main complaints were the cloudiness of the pre-made stock and not having Thai Basil. These things should be fairly easy to remedy when I try this again and it is only a matter of time until I do that!

If you like Pho Ga definitely try this recipe. It's actually quite easy.

Vietnamese Chicken Pho
Recipe Source: Jaden of Steamy Kitchen
Preparation Time: 45 cooking time + 15 minutes to cook noodles based on package directions
Servings: Makes 4 servings

Ingredients:
For the Chicken Pho Broth:
2 tbsp. whole coriander seeds
4 whole cloves
2 whole star anise
2 quarts (2 liters/8 cups/64 fluid ounces) store-bought or homemade chicken stock
1 whole chicken breast (bone in or boneless)
½ onion
1 3-inch (7.5 cm) chunk of ginger, sliced and smashed with side of knife
1 to 2 tbsps. sugar
1 to 2 tbsps. fish sauce (A note on fish sauce – I prefer the Three Crabs brand. Choose a fish sauce light in color…it should look like brewed tea. Anything darker than that (looking like Coca Cola) is inferior quality.)
1 lb. (500 grams/16 ounces) dried rice noodles (about ¼ inch/6 mm wide)

Accompaniments:
2 cups (200 grams/7 ounces) bean sprouts, washed and tails pinched off
Fresh cilantro (coriander) tops (leaves and tender stems)
½ cup (50 grams/approx. 2 ounces) shaved red onions
½ lime, cut into 4 wedges
Sriracha chili sauce
Hoisin sauce
Sliced fresh chili peppers of your choice

Directions:
1.To make the Chicken Pho Broth: heat a frying pan over medium heat. Add the coriander seeds, cloves and star anise and toast until fragrant, about 3-4 minutes. Immediately spoon out the spices to avoid burning. Char ginger and onion.
2.In a large pot, add all the ingredients (including the toasted spices) and bring to a boil.
3.Reduce the heat to medium-low and let simmer for 20 minutes, skimming the surface frequently.
4.Use tongs to remove the chicken breasts and shred the meat with your fingers, discarding the bone if you have used bone-in breasts.
5.Taste the broth and add more fish sauce or sugar, if needed. Strain the broth and discard the solids.
6.Prepare the noodles as per directions on the package.
7.Ladle the broth into bowls. Then divide the shredded chicken breast and the soft noodles evenly into each bowl.
8.Have the accompaniments spread out on the table. Each person can customize their own bowl with these ingredients.


Friday, September 4, 2009

Burger Buns

Before heading to Nagshead, goat cheese lentil burgers were back on the menu and I needed bread or buns. I didn't have milk or yogurt, so I spent some time seeking a recipe online. King Arthur's Beautiful Burger Buns were a good fit for my needs. Gosh, I love the internet.

They were simple to put together and held up really well against the prosciutto, mozzarella tomato and basil sandwiches I actually ended up eating all week. I could make the sandwich the night before, wrap it in saran wrap and leave it in the fridge with minimal deterioration. There is nothing worse than mushy food, so this was great!

The buns are slightly sweet, have a very fine i.e. messy crumb and a dry texture. While practical and good, I will probably continue to seek a different recipe for buns. I'd like a bun that makes less of a mess when I'm eating it.


Happy Labor Day!

Tuesday, September 1, 2009

Cooking Experiments from Outer Banks Trip

After my trip to Kitty Hawk with my parents, I was shocked to realize I had only read one book and magazine instead of my usual 3-4 books during the week. I couldn't figure out why but my mom knew: cooking. My somewhat selfish offer to cook almost all of our dinners, and lunches courtesy of leftovers, really ate into my reading time...

See below for what I made and any comments I can remember now that several weeks have passed. Clearly I was all about taking advantage of the fresh seafood!

Turkey Lettuce Wrap Tacos with Chiles, Cumin, Cilantro, Lime and Tomato-Avocado Salsa

These were easy to make and tasty. It's definitely a recipe to repeat. One suggestion: If your turkey looks juicy, drain it prior to adding the green onions, etc. or you'll have to cook the turkey longer than necessary to reduce the moisture and/or experience taco juice dripping down your arm. Not cool.
Sauteed Scallops with Garlic
Easy, fantastic and very exciting as "sea marshmallows" are one of my favorite foods. These turned out perfectly. Much better the last time I tried sauteing scallops back in Arlington; it was a disaster involving burned butter, rubbery yet undercooked scallops and an unpleasant, inedible mess. Since then I've learned that high heat is good when sauteing and paying attention to your cooking is essential!

Ratatouille’s Ratatouille, As envisioned by Smitten Kitchen
I improvised with wax paper instead of parchment and this recipe was still fantastic. I forget how rich vegetables can be on their own; ratatouille was a delicious, melt in my mouth reminder. This dish was by far my favorite item to reheat for lunch and future meals.

Pinocchio was a special eggplant.

Mafi’s ceviche de pescado or fish ceviche
Making this ceviche was torture. I was nervous it wouldn't go right. The steps were vague and numerous. AND how do you cut fish into small square pieces anyway?! I can tell you that you don't attempt it late in the evening at a condo with a dull knife while watching a movie. The ceviche looked pretty, even without squares in the end, and tasted pretty good too. If you attempt this, definitely make a smaller quantity. It was way too much for three people to eat and it wasn't something I wanted to revisit 24/7. Not sure I'll try this specific recipe again, especially without instruction on cutting fish.


Ginger Cucumber Salad with Scallops
I sort of made this... We brought rice wine instead of rice vinegar, so I used that combined with red wine vinegar to make the dish with shrimp. I also used canola oil instead of grapeseed and good 'ol in season American cucumbers. The adjusted recipe was still a success in my mouth. The ginger's bite, cucumber's crispness and the delicious shrimp go together well. We also had yummy corn and shrimp done the regular way with bay seasoning and cocktail sauce. Thank goodness cocktail sauce taught me to eat shrimp!


Mom's Improvised Banana Split :)

Monday, August 31, 2009

Carrot, Beet and Basil Salad

On very rare occasions, I throw something together on my own that is not only edible but something I want to share. This carrot, beet and basil salad came together right before my weeklong trip to Nagshead when I had these ingredients on hand and figured why not put them together? It is naturally sweet, has lots of crunch and doesn't require much heat making it perfect for summer.

Carrot, Beet and Basil Salad
3 beets, peeled and diced
3 carrots, peeled and diced
1 white onion, diced
1/2 c. basil, torn or chopped roughly
1-2 tbsp. creme fraiche (optional, I had it on hand)
salt to taste (not much for me personally)

It's easy enough to assemble. Dice the onions first and while preparing everything else, steam them lightly to remove some of their bite. Everything else stays raw. Combine ingredients in a bowl and toss to combine.

Friday, August 28, 2009

Paella and Irish Carbomb Cupcakes

In an ultimately successful campaign to sell me on a September Spain trip, Leslie had her friend Kristin and me over to view Vicky Cristina Barcelona and to eat delicious Paella with Chicken and Sausage. It was rich and filling; I especially loved the fresh taste of the parsley which broke up the tomato flavor and color.

My contribution were these politically incorrect, delicious Irish Car Bomb Cupcakes. Frankly it has been so long since I made them that I don't remember my impression beyond finding them amazing and a bit time consuming to make. I want to say the cupcakes were moist, rich and dense. But who knows? I guess I'll have to revisit the recipe and drink more leftover Guinness. Damn! Life is hard...

Yes, this recipe taught me that I can drink beer and it really isn't so bad. I still don't go out of my way to consume beer but the 6 year "allergy" has ended.

Thursday, August 27, 2009

Mint-Parsley Pesto with Peas and Sauteed Chicken

Nothing to say really, except I was using up parsley yet again when I made this impromptu dinner of Mint-Parsley Pesto with Peas and Sauteed Chicken for good friends.

There isn't a recipe for the pesto... I just combined garlic, olive oil, parsley, mint, walnuts and Parmesan cheese in the food processor using portions similar to your typical pesto. For some reason I chose to saute the chicken before cubing it into the pasta, which made it take forever. It tasted good, but in the future I'd just bake the chicken while the pasta was boiling. If you put the peas in the pasta water about 2 minutes before your pasta is done, then you don't have to dirty an extra dish.

Less cleanup is always awesome, even at a friend's house with a dishwasher.

Wednesday, August 26, 2009

A Variation on Zucchini Strand Spaghetti

The other night I made this delicious sounding Zucchini Strand Spaghetti only I didn't have whole wheat spaghettini, the energy to make basil oil, a mandoline or a colander big enough to drain my noodles over the zucchini to cook it.

I improvised and it worked out wonderfully. I julienned the zucchini by hand and added it to the finished basil, garlic, red pepper and oil mixture and popped the lid on for a few minutes to steam it. Combined the whole thing with some creme fraiche and took in the smooth, creamy texture in big bites.

I didn't want to stop eating it. This pasta dish feels fresh like summer, practically melting in your mouth except for the pleasant crunch of the zucchini. I will definitely revisit it before summer squash season passes.

One warning, the garlic browns fast in the hot oil. I was watching with great pleasure as this happened and then BAM it was slightly burnt. It didn't kill the dish, but it certainly would have been more appealing with slightly less burnt garlic.

Monday, August 24, 2009

Polenta With Zucchini and Tomatoes

I loved, loved, loved this Polenta With Zucchini and Tomatoes. It is easy, hearty and filling. The basil is a light, refreshing note in the midst of the savory zucchini and tomato ragout. The vegetables' smooth, yet crisp texture provide a pleasant contrast to the polenta's firmness.

I used "instant" polenta and learned the valuable lesson that once polenta solidifies into a shape there isn't any opportunity for alteration, thus the lack of a nest for the topping in my polenta square. Next time I would definitely prepare the instant polenta at the last minute rather than doing it first.

I'll definitely revisit this recipe, probably even in the winter when it isn't in season. I think I'll like its warmth even more then.

Thursday, August 20, 2009

Baked Risotto with Asparagus, Spinach, and Parmesan

During my asparagus kick back in June, I made this easy, healthy-ish baked risotto from Cooking Light. It is a solid recipe with a good flavor and attractive presentation, but it isn't as creamy and delicious as real risotto.

There is a high probabilty that the rice was undercooked and a bit firm due to my improvised dutch oven involving a glass dish and foil. Moving forward that won't be an issue thanks to self indulgence and the Le Creuset outlet in Williamsburg, Va. last week I now own a 6.75 quart black dutch oven. It's a beauty and I got it for around 60% off! I can't wait for it to reach me here in NYC. There was no way to carry it on the plane, unfortunately.

Back to the recipe, I like that it requires less attention than risotto and provided a close resemblance. I will probably try it again sometime if I'm feeling lazy. Otherwise, I'll stick to real risotto as I enjoy making things unnecessarily difficult sometimes!

Thursday, August 6, 2009

Salted Butter Caramel Ice Cream

My first ice cream attempt was Salted Butter Caramel Ice Cream, enabled again by an appliance Meg owned that I do not. The fact that I lack an ice cream maker hasn't stopped me from bookmarking recipes. I saved this one in 2007 and jumped at the opportunity to finally put it to use.

Preparing the caramel/custard base required a significant amount of time, but the heavenly smells along the way and the final result are worth the effort. I used kosher salt and half and half for all the required liquid instead of whole milk and heavy cream. Next time I might want to play with the amount and type of salt I use though since slightly salty ice cream didn't win me over completely.

The ice cream has a very rich, sweet caramel flavor; the 2.5 scoops below were a bit much even for my sweet tooth. And I skipped making the mix-in caramel praline! It freezes nicely, has a creamy texture, and is easy to scoop - no need to let it come to room temperature prior to serving. The only strange thing, and this is probably due to some error on my part, is my spoon always ended up with a slightly grainy texture after I indulged. Oh well! Still totally edible and eaten.

Wednesday, August 5, 2009

Grilled London Broil and Vegetables with Peanut Butter and Jelly Claufoutis

I headed home to Virginia for Father's Day to "surprise" my Dad and gave him his choice of meals from my culinary school binder. Naturally he chose the section I found the least appealing - grilling. I enjoy how grilled food tastes; I just can't can't take the heat!

Rather than using a grill pan, we used an outdoor grill. It was less hot, but I found grilling outdoors harder as it made getting the correct grid marks near impossible since you have to keep the grill covered to maintain a steady temperature. This drove my inner perfectionist crazy. There also was the slight problem of no real light being present at 9:30 pm and the meat ending up slightly overcooked. In spite of how I felt, Dad was very happy with his meal, which is all that matters.

I was much happier with the clafoutis I made for dessert than our main course. I followed the basic recipe provided by ICE using grapes and beat a tablespoon or so of peanut butter into the batter. It tasted like a perfectly mashed down peanut butter and grape jelly sandwich from my childhood. Yum. This dessert never gets old!