Showing posts with label dessert. Show all posts

Wednesday, June 27, 2012

Battenberg Cake

Mandy of What The Fruitcake?! came to our rescue last minute to present us with the Battenberg Cake challenge! She highlighted Mary Berry’s techniques and recipes to allow us to create this unique little cake with ease. Our cake had to be "[the traditional shape (square oblong) and had to have at least two different colored checks as well as be covered in a firm edible covering like marzipan.]"

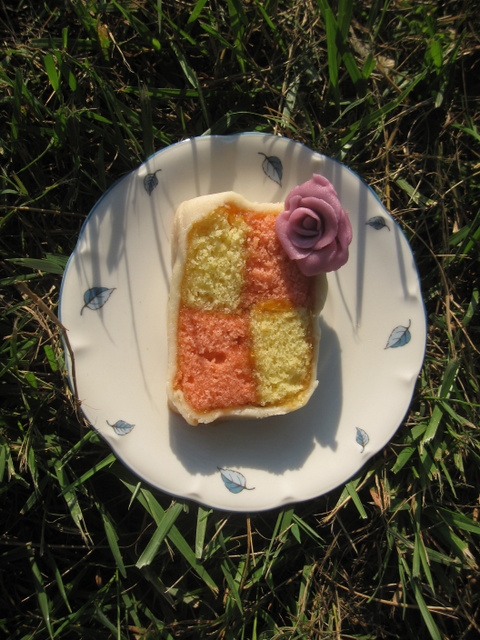
I hadn't seen a Battenberg Cake before this challenge. Its appearance and the long list of directions wowed me (and gave me pause). But I shouldn't have been intimidated. This cake is genuinely easy* to make and doesn't require any special ingredients, outside of the marzipan. Its uniquely thick batter results in a slightly sweetened cake that I thought wasn't sweet enough... Then I added the jam and marzipan and was SO thankful that it hadn't been sweeter since the combination of the three resulted in a major sugar rush!

Needless to say we got way more than 8 slices out of this baby...and I have quite the sweet tooth. I'd make Battenberg cake again, though likely with a different base cake recipe as this one was a bit dry for my liking. With a bit more time, and tweezers, I'm confident I could have had a more professional product but this version was perfectly fancy for a family day at the river. Especially after Russell did some marzipan magic and made roses to decorate it. 

For the full skinny from Mandy and photos of some crazy, awesome checkerboard cakes, visit Daring Kitchen. I have placed a slightly adapted recipe below the photos but there is more info to be had. I substituted non-strained local spiced peach preserves for the apricot jam (Thanks to Nancy at Red Dog Farm); otherwise I followed the provided instructions. You could barely taste the peach over the delicious almond/cherry flavor, which I was fine with but beware.

*We'll just ignore my failed attempt at making marzipan. If anyone has ideas for how to use almond flavored sugar/almond meal "sand" let me know. Rescue tips would also be welcome, of course.

I used a plastic knife to make swirls on top of the marzipan. Then I started to fill them in with silver sprinkles. The 90+ degree weather, looming dinner and fumbling fingers quickly killed that idea. Russell's decorative roses saved the day.

 Yep. The sprinkle swirls wouldn't been super classy. Note: This cake doesn't love heat. 
Cake & Cannon


Traditional Battenberg

3/4 cup (1 1/2 sticks) Unsalted Butter, softened & cut in cubes
3/4 cup Caster Sugar
1 1/4 cups Self-Raising Flour
3 Large Eggs, room temp
1/2 cup Almond Flour
3/4 teaspoon Baking Powder
1/2 teaspoon Vanilla Extract
1/4 teaspoon Almond Extract
Pink Food Colouring, neon pink liquid and rose gel

To Finish: 1/3 cup Spiced Peach Preserves and 1 cup / 8 oz Marzipan, natural

Directions:
1. Preheat oven to moderate 350 degrees Farenheit.
2. Grease an 8” square baking tin with butter
3. Line the tin with parchment paper, creating a divide in the middle with the parchment over a folded solid square of foil. (Or prepare Battenberg tin by brushing the tin with melted butter and flouring.)
4. Whisk together the dry ingredients then combine with the wet ingredients in a large bowl and beat together just until the ingredients are combined and the batter is smooth
5. Spoon half the mixture into the one side of the prepared baking tin
6. Add a few drops of red food liquid/gel/paste to the remaining batter, stir until the colour is thoroughly distributed, add more color if needed
7. Spoon the pink batter into the other half of the prepared baking tin
8. Smooth the surface of the batter with a spatula, making sure batter is in each corner
9. Bake for 25 - 30 minutes until the cake is well risen, springs back when lightly touched and a toothpick comes out clean (it should shrink away from the sides of the pan)
10. Leave to cool in the tin for a few minutes before turning out to cool thoroughly on a wire rack
11. Once completely cool, trim the edges of the cake with a long serrated knife. It will look unstable, if it is like mine, but will stand strong!
12. Cut each colored sponge in half lengthways so that you are left with four long strips of sponge.
13. Neaten the strips and trim as necessary so that your checkered pattern is as neat and even as possible
14. Brush jam onto the strips of cake to stick the cake together in a checkered pattern (one yellow next to one pink. On top of that, one pink next to one yellow)
15. Dust a large flat surface with icing sugar then roll the marzipan in an oblong shape that is wide enough to cover the length of the cake and long enough to completely wrap the cake
16. Brush the top of the cake with more jam.
17. Place the cake on the marzipan, jam side down (Either in the middle or to the one side of the marzipan.)
18. Brush the remaining three sides with jam
19. Press the marzipan around the cake, making sure the join is either neatly in the one corner, or will be underneath the cake once turned over.
20. Carefully flip the cake over so that the seam is under the cake and score the top of the cake with a knife, you can also crimp the top corners with your fingers to decorate.
21. Neaten the ends of the cake and remove excess marzipan by trimming off a small bit of cake on both ends to reveal the pattern

Monday, April 30, 2012

Nazook

The Daring Bakers’ April 2012 challenge, hosted by Jason at Daily Candor, were two Armenian standards: nazook and nutmeg cake. Nazook is a layered yeasted dough pastry with a sweet filling, and nutmeg cake is a fragrant, nutty coffee-style cake. Like most hosts, Jason provided background on the recipes and detailed step by step instructions. He also went above and beyond to make instructional videos as well.

I chose to make nazook as it sounded more challenging, I am not crazy about nutmeg and it was Jason's Aunt Aida's recipe. Since, God knows, I didn't need 40 pieces of pastry I halved the recipe. Then I split the filling to make two versions so I could try the traditional vanilla-scented filling and experiment with a brown sugar cinnamon filling inspired by my Mom's favorite Pop-Tarts. 

I was a bit nervous making it. Nazook was unlike any pastry or yeast recipe I previously made. It had yeast but didn't require proofing, the addition of warm liquid or rising time. The filling involved flour as well as the standard butter/sugar/flavoring combination. But I shouldn't have worried! The resulting pasty had an irresistible buttery, flaky crust with a scent that made me heady.

As for the fillings, I can't tell you which version was better in spite of many side by side tastings... Maybe I'll to decide next time. ;) If you have any suggestions for avoiding the semi-exploded appearance below in the future, please leave them in the comments. 


Nazook
Yields approximately 20 pieces

Pastry dough
1 1/2 cups All-Purpose (Plain) Flour, sifted
1 1/4 teaspoons Active Dry Yeast
1/2 cup Sour Cream
1/2 cup (1 stick) Softened, Unsalted Butter (room temperature)

Vanilla Filling
1/3 cup All-Purpose (Plain) Flour, sifted
1/3 cup Sugar
6 tablespoons Softened, Unsalted Butter (room temperature)
1 teaspoon Vanilla Extract

Brown Sugar Cinnamon Filling
1/3 cup All-Purpose (Plain) Flour, sifted
1/3 cup Brown Sugar
6 tablespoons Softened, Unsalted Butter (room temperature)
1 teaspoon Cinnamon

Wash: 1 Egg Yolk

Directions:

Make the Pastry Dough
1. Place the sifted flour into a large bowl.
2. Add the dry yeast, and mix it in.
3. Add the sour cream, and the softened butter.
4. Use your hands, or a standing mixer with a paddle attachment, to work it into a dough.
5. If using a standing mixer, switch to a dough hook. If making manually, continue to knead for about 10 minutes, or until the dough no longer sticks to the bowl or your hands. If it remains very sticky, add some flour, a little at a time.
6. Cover the dough and refrigerate for 3-5 hours, or overnight if you like.

Make the fillings
7. Mix the flour, brown or white sugar, and the softened butter in a medium bowl.
8. Add the vanilla extract or cinnamon as appropriate.
9. Mix the fillings until they looks like clumpy, damp sand. It should not take long. Set aside.

Make the nazook
10. Preheat the oven to 350 degrees Fahrenheit.
11. Cut the refrigerated dough into two halves.
12. Form one into a ball. Dust your working surface with a little flour.
13. Roll out the dough into a large rectangle or oval. The dough should be thin, but not transparent. I find it helpful to cover the dough with plastic wrap while rolling to prevent it from sticking the rolling pin.
14. Spread one of the filling mixtures across the rolled-out dough in an even layer. To get it started I rolled the filling out on top of the dough and then spread it with my fingers to get it close to the edges on the short sides while keeping about 1 inch of the pastry dough uncovered along the long edges.
15. From one of the long sides, start slowly rolling the dough across. Be careful to make sure the filling stays evenly distributed. Roll all the way across until you have a long, thin loaf.
16. Pat down the loaf with your palm and fingers so that it flattens out a bit (just a bit).
17. Apply your egg yolk wash with a pastry brush.
18. Use your crinkle cutter (or knife) to cut the loaf into 10 equally-sized pieces. Put onto an ungreased cookie sheet (I used a silipat!)
19. Repeat with the other variation or additional portion of the dough and filling. 
19. Place in a preheated moderate oven for about 30 minutes, until the tops are a rich, golden brown.
20. Allow to cool and enjoy.

Wednesday, August 17, 2011

Peach Melba Gratin

I had a 1/4 cup of raspberries weeping, literally, in the fridge and I need quick way to use them up. Searching my bookmarks for raspberry turned up Deb at Smitten Kitchen's Raspberry Brown Sugar Gratin. Having only three ingredients and very short instructions, I thought it would suit me just fine.

I didn't have enough raspberries, so I added a very ripe peach from the counter into the mix remembering Peach Melba. I've only been meaning to make it since home economics in ninth grade when another group made it and I had serious envy. It, Otis Spunkenmeyer cookies (so chewy) and making a duffel bag are all I remember from that class. Also in the spirit of peach melba, I also vanilla bean to the yogurt.

Deb mentioned using full fat Greek Yogurt in place of the traditional sour cream, I took it one step farther by killing the fat altogether. With all these changes it might taste nothing like the original, but I'll never know because I was perfectly happy with my end result. This one hit the tangy sweet spot just right. 

(It isn't super creamy this way. If you want a creamier texture, you'll want to use reduced fat or full fat yogurt.)

Peach Melba Gratin
adapted from Deb at Smitten Kitchen's Raspberry Brown Sugar Gratin
Yield 1 serving (I eeked out two and both parties wished we had more.)

1/4 cup Fresh Raspberries
1 medium Peach, peeled and sliced
1 teaspoon Brown Sugar (optional)
6 ounces Nonfat Greek Yogurt
1 teaspoon Vanilla Bean Paste (extract would be fine)
1/3 cup Brown Sugar

1. Slice the peach and add it to the raspberries in an oven safe dish (SIZE). If your raspberries are a little tart, toss in a teaspoon of brown sugar and let the mixture macerate for a bit. This will sweeten them up and make the mixture a bit juicier.
2. Preheat broiler. Spread the peaches and raspberries flat. Stir the vanilla into the yogurt and spread it across the fruit. Sprinkle the brown sugar evenly across the surface (Deb recommends a sieve or mesh colander for this.).
3. Place the dish under the broiler until the sugar just starts to caramelize, approximately 4-5 minutes in my oven.
 

Sunday, July 31, 2011

Blackberry Fraisier, er, Mûrier

Jana of Cherry Tea Cakes was our July Daring Bakers’ host and she challenges us to make Fresh Frasiers inspired by recipes written by Elisabeth M. Prueitt and Chad Robertson in the beautiful cookbook Tartine. We were required to make chiffon cake, pastry cream mousse and simple syrup from scratch; the cake had to feature fruit on its sides and be free standing. You can download the full challenge and recipes here.

Don't be intimidated. I promise this is totally do-able. Making the components requires some advance planning due multiple steps and a 4 hour minimum chill time time, but as long as you pay attention the recipes are manageable! The Fraisier's assembly is by far the hardest part, but even my products' imperfect appearance looks impressive and more importantly it was delicious.

If you like desserts that are fruity, creamy and light on the palate (though not so much on the waist), then a Fraisier is perfect for you. The chiffon cake has a tender texture similar to Angel food cake and soaking it in simple syrup makes it very moist. If you flavor your simple syrup effectively, I'd imagine it also adds an extra flavor dimension. Since my ginger simple syrup wasn't detectable I ended up with blackberry and vanilla for my flavor profile and that was fine with me.

The pastry cream's speedy production really impressed me. It was so quick that when I walked away from the stove after returning the custard to it it clumped (see the picture with an x over it below) and I had to start again. As far as mistakes go this one wasn't so bad; Dad has been quite happy with the leftover lumpy pastry cream. I may make it my go to recipe

Thank you for a cool, sweet, summer challenge, Jana! It was a perfect fit for Virginia's heat wave and berries from the Red Dog Farm.


Basic Chiffon Cake
1 cup and 2 tablespoons All-Purpose Flour
1 teaspoon Baking Powder
3/4 cups Sugar
1/2 teaspoon Salt, preferably Kosher
1/4 cup Vegetable Oil (I used Canola.)
3 large egg yolks
1/3cup and 1 tablespoon Water
1 teaspoon Pure Vanilla Extract
3/4 teaspoon Lemon Zest, grated
5 Large Egg Whites
1/4 teaspoon Cream of Tartar

1. Preheat the oven to 325 degrees Farenheit.
2. Line the bottom of an 8-inch spring form pan with parchment paper. Do not grease the sides of the pan. (I didn't have a springform pan and substituted a 13 x 9 x 2 Pyrex baking dish.)
 3. In a large mixing bowl, stir together the flour and baking powder. Add in all but 3 tablespoons of sugar, and all of the salt. Stir to combine.
4. In a small bowl combine the oil, egg yolks, water, vanilla and lemon zest. Whisk thoroughly.
5. Combine with the dry ingredients and mix thoroughly for about one minute, or until very smooth.
6. Put the egg whites into a stand mixer, and beat on medium speed using a whisk attachment on a medium speed, until frothy. Add cream of tartar and beat on a medium speed until the whites hold soft peaks. Slowly add the remaining sugar and beat on a medium-high speed until the whites hold firm and form shiny peaks.
7. Using a grease free rubber spatula, scoop about 1/3 of the whites into the yolk mixture and fold in gently. Gently fold in the remaining whites just until combined.
8. Pour the batter into the prepared pan. Bake for 45 to 55 minutes or until toothpick inserted into the center comes out clean.
9. Remove the cake from the oven and allow to cool in the pan on a wire rack. (Mine sunk a little. Reading through other Daring Baker's comments it looks like cooling it in the pan upside down helps to avoid sinking.)
10. To unmold, run a knife around the sides to loosen the cake from the pan and remove the spring form sides. Invert the cake and peel off the parchment paper. Refrigerate for up to four days.


Pastry Cream Filling
1 cup Whole Milk
1/2 teaspoon Pure Vanilla Extract
1/8 teaspoon Salt, preferably Kosher
2 tablespoons Cornstarch
1/4 cup Sugar
1 Large Egg
2 tablespoons Unsalted Butter
3/4 teaspoon Gelatin
1/2 tablespoon Water
1 cup Heavy Cream

1. Pour the milk, vanilla, and salt into a heavy sauce pan. Place over medium-high heat and scald, bringing it to a near boiling point. Stir occasionally.
2. Meanwhile, in a stand mixer add the cornstarch and sugar. Whisk to combine
3. Add the eggs to the sugar and cornstarch and whisk until smooth.
4. When the milk is ready, gently and slowly while the stand mixer is whisking, pour the heated milk down the side of the bowl into the egg mixture.
5. Pour the mixture back into the warm pot and continue to cook over a medium heat until the custard is thick, just about to boil and coats the back of a spoon. Do not walk way... This happens quickly!
6. Remove from heat and pass through a fine mesh sieve into a large mixing bowl. Allow to cool for ten minutes stirring occasionally.
7. Cut the butter into four pieces and whisk into the pastry cream a piece at a time until smooth.
8. Cover the cream with plastic wrap, pressing the plastic wrap onto the top of the cream to prevent a skin from forming. Chill in the refrigerator for up to five days.
9. In a small dish, sprinkle the gelatin over the water and let stand for a few minutes to soften.
10. Put two inches (55 mm) of water into a small sauce pan and bring to a simmer over a medium heat.
11. Measure 1/4 cup (2 oz/60 ml) of the chilled pastry cream into a small stainless steel bowl that will sit across the sauce pan with the simmering water, without touching the water.
12. Heat the cream until it is 120 degrees Fahrenheit. Add the gelatin and whisk until smooth. Remove from the water bath, and whisk the remaining cold pastry cream in to incorporate in two batches.
13. In a stand mixer, fitted with the whisk attachment, whip the cream until it holds medium-stiff peaks. Immediately fold the whipped cream into the pastry cream with a rubber spatula.


Simple Syrup
You may choose to flavor the syrup. One way is to use flavored sugar (for example: apple cider sugar, orange sugar, or vanilla sugar) or to stir in 1-2 teaspoons of flavored extract. You may also infuse with herbs or spices, if desired or add four tablespoons of fruit juice or liqueur while the syrup is cooling.

1/3 cup Sugar, flavored or white
(1/4 cup peeled and sliced Ginger)
1/3 cup Water

1. Combine the water and sugar in a medium saucepan.
2. Bring the mixture to a boil and let the sugar dissolve. Stirring is not necessary, but will not harm the syrup.
3. Remove the syrup from the heat and cool slightly.
4. Transfer syrup to a lidded container or jar that can be stored in the refrigerator. Simple syrup can be stored for up to one month.

Fraisier Assembly
Components
1 baked 8 inch Chiffon Cake
1 recipe Pastry Cream Filling
1/3 cup Simple or Flavored Syrup
2 lbs Strawberries
(Traditionally it is covered with almond paste, but I skipped this and used extra pastry cream to "frost" the top of mine.)

1. Line the sides of a 8-inch spring form pan with plastic wrap. Do not line the bottom of the pan.
2. Cut the cake in half horizontally to form two layers.
3. Fit the bottom layer into the prepared spring form pan. Moisten the layer evenly with the simple syrup. When the cake has absorbed enough syrup to resemble a squishy sponge, you have enough.
4. Hull and slice in half enough strawberries to arrange around the sides of the cake pan. Place the cut side of the strawberry against the sides of the pan, point side up forming a ring.
5. Pipe cream in-between strawberries and a thin layer across the top of the cake.
6. Hull and quarter your remaining strawberries and place them in the middle of the cake. Cover the strawberries and entirely with the all but 1 tbsp. of the pastry cream.
7. Place the second cake layer on top and moisten with the simple syrup.
8. Cover with plastic wrap and refrigerate for at least 4 hours. The longer it chills, the more firm the gelatin will become.
9. To serve release the sides of the spring form pan and peel away the plastic wrap.
10. Serve immediately or store in the refrigerator for up to 3 days.

Wednesday, June 22, 2011

Summer Squash Brownies

Interning at Red Dog Farm is leaving me with lots of delicious summer squash! For some reason people at the market seem to prefer sleek, green zucchini over its bumpy yellow sibling, squash, so I wanted to think of a way to encourage squash consumption. And what better way than incorporating it into something sweet? If it can be done with zucchini, it can be done with squash. After all they are pretty much interchangeable due to their mild flavor and high water content.

This reasoning and insatiable craving for chocolate led to brownies. Inspired by the recipes listed at the end of the post, I came up with a fudge-like brownie that no one will guess contains squash. I've also limited the amount of added fat and sugar in the recipe, making it a healthier choice than many brownie recipes out there.

Pleased with my end result I brought, apparently illegal, samples to the Farmer's Market this past weekend. They were gone by 9:47 a.m. as were our blueberries, which I'd say makes them a hit. Even the small children who tried them were happy (and none the wiser). I liked that people liked them and I liked it even better that I wasn't busted by an inspector for my contraband baked goods! Enjoy.

Summer Squash Brownies
Yield: One 8 x 8 square pan, which I cut into 25 pieces

4 ounces Unsweetened Chocolate
3 tablespoons Unsalted Butter
1 teaspoon Vanilla
1 cup Sugar
1/2 teaspoon Salt
1/4 cup Whole Wheat Flour (All all-purpose flour should be fine too.)
1/2 cup Unbleached All-Purpose Flour
3 Large Eggs at Room Temperature
1 cup Grated, Pressed Summer Squash
1/3 cup Semisweet Chocolate Chips

1. Grate the squash using the large holes on a box grater or a food processor's grating plate. Place the grated squash in a colander with small holes over the sink and press the liquid out with a spatula. Let the squash rest in the colander in the sink.
2. Preheat the oven to 350 degrees Fahrenheit and grease a 8 x 8 baking dish with olive oil. 
3. Place 4 ounces of unsweetened chocolate in a large, microwave-safe mixing bowl. Heat on high for 2 minutes, then stir. Return to the microwave for another minute on high, remove, stir and add the butter. Heat for another 30 seconds. You want the butter and chocolate to both be just melted. Stir them until smooth. 
4. Add 1 cup of sugar, 1/2 teaspoon of salt, 1 teaspoon of vanilla, 1/4 cup of whole wheat flour and 1/2 cup of white all purpose flour to the chocolate and butter mixture. Stir to combine. It will look very dry...
5. Crack the 3 eggs into the bowl. Stir to combine.
6. Press the squash one more time to get as much liquid out as possible. Measure out 1 cup of it into the bowl. Stir.
7. Add 1/3 cup of chocolate chips to the bowl and stir them into the batter.
8. Pour batter into the prepared 8 x 8 pan and place it in the oven. Bake for 20 minutes or until a knife pierced in the middle of the pan comes out free of crumbs. Take care not to overcook the brownies or they will get dry.
9. Remove the pan to a rack to cool for 5 minutes, then remove it from the pan onto the rack. Once cool wrap in plastic and chill overnight. While the brownies can be consumed hot, they taste best the next day.

They also taste good slightly frozen.  


Recipes Referenced
Chocolate Zucchini Cupcakes at 101 Cookbooks
Fudgy Brownies at Martha Stewart via The Kitchn
Fudge Drops at King Arthur Flour
How to: Make Cakey, Chewy and Fudgy Brownies at Fine Cooking via The Kitchn
Moosewood Fudge Brownies at Everybody Likes Sandwiches
Zucchini Chocolate Chip Cookies from the great book Animal, Vegetable, Miracle

Wednesday, June 1, 2011

Honey-Rum Roasted Rhubarb

Last year Molly from Orangette wrote about her variation on Canal House's Roasted Rhubarb so convincingly that I had to try it. It was a risky move as I had never had rhubarb without strawberries, but there was reward in its sweet, tart taste. So for a while I reveled in it and then rhubarb was out of season.

Cue Spring in Richmond this year and a dearth of rhubarb. Apparently it is a Northern crop, so it isn't widely anticipated or available here the way it is in New York City. After a few weeks of searching I was resigned to not having rhubarb, then I saw it on Farm to Family's produce list! I squealed and promptly went to pick up some of the red celery-looking stalks.

Molly's original version still is great, but I've tinkered with it a bit halving the proportions, removing the refined sugar and using rum in lieu of wine. With wine you end up with a spare 3.5 cups to drink, which didn't interest me nor did cluttering the fridge with the bottle. Rum can be held for at room temperature in the pantry and it goes well with honey.

This rhubarb has more flavor and is sweeter when cold, so I recommend eating it that way although it eating it while its warm won't hurt you. Enjoy the rhubarb on its own, over plain greek yogurt for breakfast or over popovers, which convinced my mom that "stewed rhubarb" as she was raised eating it was actually quite tasty rather than the mushy, undesirable stuff of her memories.

Honey-Rum Roasted Rhubarb
Adapted from Molly at Orangette's twist on a recipe by Canal House Cooking, Volume 3.*
Yield approximately 1.5 cups

1 pound Rhubarb, trimmed (the leaves are poisonous!) and cut into 2-inch lengths
1/4 cup Honey (I used clover.)
3 tablespoons White Rum (We had Ronrico. Don't judge. It worked.)
1 tablespoon Water
1/2 Vanilla Bean, split up its center

1. Set a rack in the lower third of the oven, and preheat the oven to 350 degrees Fahrenheit.
2. Pour the honey, rum and water into the bottom of a pyrex dish (a dutch oven or other over-safe pot would work too). Add the rhubarb and stir gently to combine the ingredients.
3. Bake uncovered for 15 minutes, then remove the dish and stir the rhubarb to ensure even cooking.
4. Return the dish to the oven and continue baking it for 15 more minutes.
5. Remove from the oven, cool briefly on the counter and then place it in the fridge to cool overnight.


*It looks like David Lebovitz and Sarah Galvin at All Our Fingers in the Pie have done something similar too!

Monday, May 9, 2011

Delicious Imperfection: Mother's Day Cupcakes

Mom loves yellow cake with chocolate frosting so I tried making a small batch of cupcakes for Mother's Day. Things did not go as planned but the results were still pretty delicious. To demonstrate how my cooking and baking are a work in progress and as part of my ongoing effort to embrace imperfection, I thought I'd tell you about the cupcakes anyway.

Initially I couldn't find a yellow cake recipe in my bookmarks, then I realized yellow cake is the same as any basic cake. Its name just refers to the whole eggs being used. Once that was resolved, I printed Cupcake Project's 3 Vanilla Cupcakes with Vanilla Sea Salt with the intention of halving the recipe and using one vanilla. I set out the egg and 3/4 cup of butter to come to room temperature and started dinner. If only I also had taken the time to note the halved portions on the recipe...

Because guess who added the full portion of vanilla sugar to the halved butter? This shouldn't have been a problem as I'm not one to cry over double the cupcakes but it turns out I was short an egg and lacked the quantity of milk needed to make even the halved portion. I improvised and made up the difference with a flax egg and buttermilk. Somehow, God only knows, the batter still was lovely, light and delicious going into the oven.

Unfortunately after baking my cupcakes had concave midsections. Oops! Since the cake was still moist, buttery, vanilla goodness I need another solution. Cue filling their bellies with glossy chocolate ganache. The end product looked decent, tasted good and could be eaten with a spoon. Mom was happy and I was placated. Where there is a will there is a way... But next time I bake I'll try to remember the notes below.

1. Check ingredients prior to starting a project
2. If you plan to halve a recipe, take the time to write out the reduced proportions.
3. Pay full attention when baking (and cooking) for best results.
4. Baking is a science! Improvised baked goods are best left to professionals (or at least left for occasions where there isn't time-sensitivity.)


Find more songs like A Better Son/Daughter at Myspace Music

Wednesday, May 4, 2011

Garam Masala Oatmeal-Raisin Cookies

Inspired by Julie at One-Wall Kitchen's decision to include maple mousse as a ripple in homemade apple cinnamon ice cream I decided to freeze my leftover mousse and make "ice cream" sandwiches. Cinnamon and maple sounded great, so I wanted to use oatmeal raisin cookies. Needless to say when I spotted the Garam Masala Oatmeal-Raisin Cookies Monica Bhide adapted it was all over.

I halved the original recipe and then going by taste reduced the garam masala by an additional 1/4 teaspoon since my spice tolerance isn't the highest. The remaining garam masala and raisins still provided plenty of flavor to mask my other change -- switching out the white flour for whole wheat as whole grains are good. The resulting cookies are chewy inside with a crisp exterior and a slightly spicy flavor that builds as you eat them.

Making these cookies was so easy I am wondering why I don't make cookies more often...we'll see what happens there. Ha! As for the maple mousse, it was tasty cold but a little chewy once frozen. That won't be happening again.

Garam Masala Oatmeal-Raisin Cookies
Slightly adapted from these Garam Masala Oatmeal-Raisin Cookies Monica Bhide adapted at NPR's Kitchen Window
Yields 2 dozen cookies

3/4 cup Regular or Quick-Cooking Oats
3/4 cup Whole Wheat Flour
1/2 tsp Garam Masala (I used store-bought.)
1/4 tsp Baking Soda
1/2 tsp Baking Powder
1/2 tsp Kosher Salt
1/2 stick (1/4 cup) Unsalted Butter, room temperature
1/4 cup Granulated Sugar
1/4 cup packed Dark Brown Sugar
1 Large Egg, room temperature
1/2 tsp Vanilla Extract
1/2 cup Raisins

1. Preheat oven to 350 degrees. Grease two cookie sheets or place Sil-pats on them.
2. Combine the oats, flour, garam masala, baking soda, baking powder and salt in a medium bowl. Set aside.
3. Mix the butter and sugars in a large bowl with an electric mixer on medium speed until creamy.
4. Add the egg and fully incorporate it into the dough. Add the vanilla.
5. Add the flour mixture one third at a time and mixing until just combined after each addition.
6. Mix in the raisins.
7. Using a half tablespoon measuring spoon, place balls of dough onto cookie sheets. Flatten slighty.
8. Bake 12 to 14 minutes or until golden (my oven took 12 minutes). Cool on wire racks.


This song is still catchy and the video is still great, even if I'm not bitter about anyone I used to date at this point.

Wednesday, April 27, 2011

Maple Mousse in Carrot Cake Cookie Cups

The April 2011 Daring Bakers’ challenge was hosted by Evelyne of the blog Cheap Ethnic Eatz. Evelyne chose to challenge everyone to make a maple mousse in an edible container. Prizes are being awarded to the most creative edible container and filling, so vote on your favorite from April 27th to May 27th at http://thedaringkitchen.com! You can download all the details and provided recipes here. Thanks for another tasty challenge, Evelyne. Maple Mousse in Carrot Cake Cookie Cups was a big hit with my extended family on Easter.

Evelyne made bacon cups and nut cups for her maple mousse. I created a carrot cake "cookie cup" to hold mine. The cookies are very soft with a nice spice flavor from cinnamon and ginger and a little bit of crunch/chew from the currants and walnuts. They aren't too sweet either, which was a plus since the creamy and delicious maple mousse is pretty darn sweet on its own. I tried three methods to make the "cups" and have detailed each below in the instructions. I recommend making the largest cups as they were the easiest and allowed maximum mousse consumption.

My mousse's texture was slightly bumpy, but I would try the making it again. It tasted light in spite of being anything but with all that whipping cream and the egg yolks! I suspect my problem was the gelatin setting beyond where it should have before I could fold in the whipped cream but only time will tell... As for the cookies, I'll definitely have them again and when I do I'll add a yield for the recipe. They can be baked in a mini-muffin tin for your own Two-Bite Treat a la Whole Foods or served topped with the traditional cream cheese frosting.

Oh and I attempted these carrot curls as toppers but they didn't pan out. Candied carrot crumbles took their place - less pretty but still effective. If you have any technical or other suggestions for me, please pass them along. There is always refining to be done... Have a great day!

Maple Mousse
Yield 6 cups

1 cup Pure Maple Syrup (not maple-flavoured syrup)
4 Large Egg Yolks
1 package/ 1 Tbsp. Unflavored Gelatin
1.5 cups Whipping Cream (35% fat content)

1. Bring maple syrup to a boil then remove from heat. (Choose a saucepan big enough to hold all of the mousse.)
2. Meanwhile, in a large bowl whisk egg yolks. Pour a bit of the heated maple syrup into the egg yolks while whisking (this will temper your egg yolks so they don’t curdle).
3. Add warmed egg yolks to hot maple syrup and whisk until well mixed.
4. Measure 1/4 cup of whipping cream in a bowl and sprinkle it with the gelatine. Let it rest for 5 minutes. Place the bowl in a microwave for 45 seconds (microwave for 10 seconds at a time and check it in between) or place the bowl in a pan of barely simmering water, stir to ensure the gelatine has completely dissolved.
5. Whisk the gelatine/whipping cream mixture into the maple syrup mixture and set aside.
6. Whisk occasionally for approximately an hour or until the mixture has the consistency of an unbeaten raw egg white. (Note: I set a timer and checked at intervals. As of 35 minutes it was the consistency of rubber cement...too hard...but still usable. Keep close watch!)
7. Whip the remaining cream. Stir 1/4 of the whipped cream into the maple syrup mixture. Fold in the remaining cream, transfer to a more fridge-friendly container and refrigerate for at least an hour.
8. Remove from the fridge and divide equally among your edible containers.

Carrot Cake "Cookie Cup"
Improvised using Simplifried's Cookie Template and several Carrot Cake/Cupcake recipes (Orangette, Cooking Light, The Delicious Life, Cupcake Project, Yum Sugar, Deliciously Organic)
Yield TBD

1 stick Unsalted Butter
1/2 cup and 1 tbsp. White Sugar
1/4 cup Brown Sugar
1 Egg, room temperature
1 tsp Vanilla Extract
1 2/3 cups All Purpose Flour
1 tsp Baking Soda
1/2 tsp Salt
2 tsp Cinnamon
1/2 tsp Ginger
1/4 cup Walnuts, chopped
1/2 cup Carrot, grated and drained (or liquid pressed out if you are short on time like me!)
1/4 cup Currants (substitued for raisins per The Cupcake Project's lead)

1. In the bowl of a large mixer combine 1 stick of butter, 1/2 cup and 1 tablespoon of white sugar and 1/4 cup of brown sugar. Mix on high until the butter gets fluffy and turns light yellow. The sugar should all be incorporated. Once this happens add the egg and vanilla extract and continue mixing for 15 seconds.
2. Add the flour, baking soda, cinnamon and ginger. Mix until fully incorporated.
3. Add the walnuts, carrot and currants. Mix until just incorporated.
4. Transfer the dough into plastic wrap or a greased bowl covered in plastic and place it in the freezer for 20 minutes. Preheat the oven to 375 degrees Farenheit.
5a. Lightly oil mini-cupcake tin. Scoop 1 tablespoon of dough into each cupcake form. Bake cookies for 10 minutes*. Grease back of scoop. Remove cookies from oven and immediately press the tops with the scoop/measuring spoon to create an cup-like indention.
5b. Lightly oil upside down mini-cupcake tin. Scoop tablespoon of dough into your lightly oiled hand. Flatten. Lay over the mini-cupcake tin. Bake 10 minutes*. Cool and remove from tin. (I don't recommend this as they often crumbled.)
5c. Lightly oil a regular cupcake tin. Scoop 2 tablespoons of dough into each cupcake form. Bake cookies for 10 minutes*. Grease a shot glass. Remove cookies from oven and immediately press the tops with the shot glass to create a cup-like indentation.
6. Remove to a baking sheet to cool. The mousse will melt if you top them while they are hot.
I haven't tried it but Greenism smooshed her cookie containers into cups halfway through the baking process. That might be even better!

*Or until a toothpick pressed into the center comes out clean.


Courtney, of course, highlighted that Fleet Foxes have a new album coming out and it can be streamed online at NPR, so they seemed like a great band to highlight this post.

Find more artists like FLEET FOXES at Myspace Music

Wednesday, April 20, 2011

Marshmallows

A few Sundays ago I headed to the one of my best friend's parent's house to make marshmallows with her younger sister, Sasha. We had a lot of fun tackling this simple project and then I had the pleasant surprise of joining their family for dinner. It was great to catch up and relax with people who have known me for half my life... The only thing that would have made it more fun would have been having Vika, Rafe and Fiona there too.

As long as you have a mixer, marshmallows are so easy to make that you have no excuse not to skip Peeps and make your own Easter treats. Plus making your own marshmallows means you can choose your own color(s). While homemade marshmallows aren't healthier, but they certainly are tastier and have a softer texture than store bought marshmallows. They will literally melt in your mouth. They also will coat many things with their sticky residue, but clean-up is easy. Carefully fill the mixing bowl, saucepan, etc. with very hot water and the sugar will dissolve away on its own.

Next time I make marshmallows I'm going to try coating the pan directly with the oil, spooning in the rice flour/confectioner's sugar mixture and carefully rotating the pan to coat it with the mixture to see if the liner can be avoided to make things a touch greener. I'll let you know what happens...

One last note - making the marshmallows takes less than an hour but keep in mind that they require at least 6 hours of setting time.

Homemade Marshmallows
Lightly adapted from Molly at Orangette's Marshmallows and Nicole of Baking Bite's Marshmallows - both of which appear to follow Thomas Keller of French Laundry fame's lead.

1/2 cup cold water
3 envelopes of unflavored gelatin (1/4 ounce each or 2 1/4 to 2 1/2 teaspoons as per David Lebovitz)
2 cups granulated sugar (I used white.)
2/3 cups light corn syrup
1/4 teaspoon salt
1/2 cup water
Saran Wrap or Foil
Olive Oil
Food Coloring (optional)
Vanilla Extract to taste
1/2 cup Confectioners' sugar
1/2 Rice flour

1. Pour 1/2 cup cold water into an electric mixer's bowl, sprinkle the three packets of gelatin over it. Soak for 10 minutes. Don't be alarmed when it looks dry as that is normal.
2. Combine the sugar, corn syrup, salt and remaining 1/2 cup of water in a small saucepan. Bring to a boil and boil hard for 1 minute. Taking care to not let syrup crystallize on the sides of the sauce pan.
3. Carefully pour the very hot syrup into the gelatin and turn the mixer up to high. Beat until the mixture has turned bright white and looks thick (approximately 15 minutes).
4. While the mixture is beating, line a 13 x 9 x 2 inch pan with plastic wrap or foil. Pour a bit of olive oil onto a paper towel and coat the liner's surface lightly with it. If desired, drizzle food coloring on the surface of the liner for a festive touch.
5. Return to the fluffed up marshmallow and add the vanilla. Continuing to beat the mixture until it is fully incorporated.
6. Scrape the mixture into the pan and spread evenly using a lightly oiled spatula.
7. Let the mixture sit at least 5 hours; I usually let it sit overnight.
8. Combine the rice flour and Confectioner's sugar. Generously dust the surface of the marshmallow block with the mixture, remove it from the pan flipping it upside down. Peel off the pan liner and coat surface with the flour/sugar mixture. Using a lightly oiled pizza wheel (a knife or scissors will work too!) cut the marshmallow into the desired size. Coat each block in the flour/sugar mixture to prevent sticking.
9. Store in a covered container at room temperature.

Our finished product ready for consumption. Yum.

Hydrated Gelatin

The sugar-syrup mixture getting ready to get hot.

I decided the syrup mixture was ready at this time and checked the temperature out of curiosity. Molly's 240 degree temperature was dead on with the one minute boiling time.

Prior to mixing the gelatin and syrup mixture.

Neon food coloring dots are in place. Don't try painting them on an oiled surface with Q-tips. It won't work.

Ooey, gooey marshmallow that is ready for pan placement.

Sasha smoothing our product out. Hands work too.

Pretty colors appear at the bottom of the pan while the top stays brilliantly white.


Other marshmallow recipes I have bookmarked:
Champagne Marshmallows
Chocolate Malt Marshmallows (I love malts.)
I also have added peppermint extract and red food coloring to marshmallows before to make them peppermint. They were a fun Christmas-time gift.


Sunday, March 27, 2011

Coconut Chai Yeasted Meringue Coffee Cake

VCU Men's Basketball WON against Kansas! We are going to the final four! I am so excited. Please join me and cheer us on next Saturday night. Now to something else delightful... 

The March 2011 Daring Baker’s Challenge was hosted by Ria of Ria’s Collection and Jamie of Life’s a Feast. Ria and Jamie challenged The Daring Bakers to bake a yeasted Meringue Coffee Cake. Their full instructions can be found here. Inspired by Ria's use of saffron to flavor the dough and some tea bags I had I came up with Chai Coconut for my flavoring.

As you can see it got a little too brown while I watched VCU beat Purdue last Sunday, the ring didn't match up perfectly and the meringue oozed a little during the second rise, which bothered me wasn't really bad as the ooze was chewy and delicious once baked. I also forgot to put the granulated sugar/cayenne inside so I brushed the outside with the egg wash, sprinkled some on and then brushed with more egg wash. It worked though I will try it the regular way to see what difference it makes to the texture.

Regardless of these little imperfections, I loved the end result. This cake is just sweet enough for a slightly indulgent breakfast and has a fun crunch thanks to the coconut and a kick from the ginger and cayenne. I highly recommend that you make some version of it, if you haven't already. This bread really reminded me of stollen and that is a high compliment as it was one of my favorite Daring Kitchen challenges to date.

Filled Meringue Coffee Cake
Halved to make 1 round coffee cake, approximately 10 inches in diameter.

For the yeast coffee cake dough
2 cups flour
1/8 cup sugar
1/4 and 1/8 teaspoons salt
1 1/8 teaspoons active dried yeast
1/3 cup whole milk
1/8 cup water
1/4 cup unsalted butter, room temperature
1 large egg, room temperature
1 Celestial Seasonings' Decaf Sweet Coconut Chai tea bag

For the meringue
1.5 large egg whites at room temperature (made that happen with Just Whites)
1/8 teaspoon salt
1/4 scant teaspoon vanilla
2 drops coconut extract
1/4 cup sugar

For the filling
1/2 cup Unsweetened Coconut, shredded
1/2 cup Semisweet Chocolate, coarsely chopped
1 HEAPING tablespoon Candied Ginger, Chopped (need to find a better way

Egg wash
1 beaten egg
1 tablespoon granulated sugar
1/8 teaspoon cayenne pepper

Directions

Prepare the dough
1. In a large mixing bowl, combine 3/4 cups of the flour, the sugar, salt and yeast.
2. In a saucepan, combine the milk, water and butter and heat over medium heat until warm and the butter is just melted. Add the Decaf Sweet Coconut Chai tea bag and steep off of the heat for 10 minutes.
3. With an electric mixer on low speed, gradually add the warm liquid to the flour/yeast mixture, beating until well blended. Increase mixer speed to medium and beat 2 minutes. Add the eggs and 1/2 cup flour and beat for 2 more minutes.
4. Add enough of the remaining flour to the mixer and run until the dough holds together (this required almost an additional full cup of flour for me). Switch to the dough hook and knead the dough for approximately 5 minutes until the dough is soft, smooth, sexy and elastic, adding extra flour as needed.
5. Place the dough in a lightly greased bowl, turning to coat all sides. Cover the bowl with plastic wrap and a kitchen towel and let rise until double in bulk, 45 – 60 minutes. The rising time will depend on the type of yeast you use.

Prepare your filling:
1. In a small bowl, combine the cayenne and sugar for the filling if using. Chop chocolate and ginger. Measure out coconut.

Once the dough has doubled, make the meringue:
1. In a clean mixing bowl (plastic or glass) beat the egg whites with the salt, first on low speed for 30 seconds, then increase to high and continue beating until foamy and opaque.
2. Add the vanilla and coconut then start adding the 1/4 cup sugar, a tablespoon at a time as you beat, until very stiff, glossy peaks form.

Assemble the Coffee Cake:
1. Line baking/cookie sheet with parchment paper.
2. Punch down the dough. On a lightly floured surface, roll out the dough into a 20 x 10-inch rectangle. Spread meringue evenly over the rectangle up to about 1/2-inch (3/4 cm) from the edges. Sprinkle your filling of choice evenly over the meringue.
3. Roll up the dough jellyroll style, from the long side. Pinch the seam closed to seal.
4. Very carefully transfer the filled log to the lined cookie sheets, seam side down. Bring the ends of the log around and seal the ends together, forming a ring, tucking one end into the other and pinching to seal.
5. Using kitchen scissors , make cuts along the outside edge at 1-inch intervals. Make them as shallow or as deep as desired but don’t be afraid to cut deep into the ring.
6. Cover the coffee cake with plastic wrap and allow it to rise again for 45 to 60 minutes.
7. Preheat the oven to 350°F.
8. Brush the top of the coffee cake with the egg wash. Bake in the preheated oven for 25 to 30 minutes until risen and golden brown. The dough should sound hollow when tapped.
9. Remove from the oven and slide the parchment paper off the cookie sheet onto the table. Very gently loosen the coffee cake from the paper with a large spatula and carefully slide it onto cooling racks. Allow to cool.
10. Enjoy! These are best eaten fresh, the same day or the next day.


I like to hold the bowl upside down to prove I have reached stiff peaks. It makes for a nice little thrill. 


Find more WIZ KHALIFA songs at Myspace Music

Sunday, February 27, 2011

Vanilla Mint Panna Cotta and Florentine Cookies

The February 2011 Daring Bakers’ challenge was hosted by Mallory from A Sofa in the Kitchen. She chose to challenge everyone to make Panna Cotta from a Giada De Laurentiis recipe and Nestle Florentine Cookies. The panna cotta was luscious and the crispy, sweet florentine cookies irresistible. It was a fun challenge without obscure ingredients or tedious steps. Thank you for hosting, Mallory.

In high school my favorite lip products were Victoria's Secret's Enchanted Pear Roll-On Gloss and Bath & Body Works' Vanilla Mint Lip Balm. They were tasty enough that their application was counterproductive to providing lip moisture as I licked them right off. I also sometimes offered flavor choices to boys I dated prior to kissing. What a catch! Ha. Remembering all this inspired me to flavor my panna cotta Vanilla Mint. The end result tasted more natural than that lip gloss but was still sweet, refreshing and, thanks to the recipe's high fat content, left my lips feeling (temporarily) moist.

The Florentine Cookies' impressive appearance belies the work involved. They can be baking in under 30 minutes and can burn quickly, so keep an eye on them once they are in the oven. The batter looks very wet but the liquid becomes a toffee-like gold. Trust me. Don't add dry ingredients or you will end up with a sad, heavy cookie. I didn't like them as much with chocolate since it overwhelmed the buttery, toffee flavor but feel free to try it. These Oatmeal Lace Cookies from when the Daring Cooks tackled Nut Butters are very similar and also delicious. For either cookie plan to eat them fairly quickly as they soften over time.

You can download Mallory's tips and all the related recipes here. My adjusted version of the panna cotta is below. The texture was good but I had a bit of trouble unmolding it. Maybe next time it will go more smoothly! But I will definitely use greek yogurt or similar in the future to reduce the fat. All that cream overwhelmed me.

Giada's Vanilla Panna Cotta

1 cup whole milk
1 tablespoon (one packet)unflavored powdered gelatin
3 cups whipping cream (30+% butterfat)
1/4 cup agave nectar (this was 1/3 cup honey)
1 tablespoon granulated vanilla sugar
1 teaspoon vanilla bean paste
3 stalks of mint
2 drops peppermint extract
pinch of salt

Directions:
1. Pour the milk into a bowl or pot and sprinkle gelatin evenly and thinly over the milk (make sure the bowl/pot is cold by placing the bowl/pot in the refrigerator for a few minutes before you start making the Panna Cotta). Let stand for 5 minutes to soften the gelatin.
2. Pour the milk into the saucepan/pot and place over medium heat on the stove. Heat this mixture until it is hot, but not boiling, about five minutes. Add three stalks of mint. (I whisk it a few times at this stage).
3. Next, add the cream, honey, sugar, vanilla bean paste, peppermint extract and pinch of salt. Making sure the mixture doesn't boil, continue to heat and stir occasionally until the sugar and honey have dissolved 5-7 minutes.
4. Remove from heat, remove mint stalks, allow it to sit for a few minutes to cool slightly. Then pour into the glass or ramekin.
5. Refrigerate at least 6 hours or overnight. Add garnishes and serve.


Find more artists like Anya Marina at Myspace Music

Thursday, February 3, 2011

Bailey’s Chocolate Chip Cookies

I know I just posted cookies last week but these were even better than I remembered so I needed to share them immediately. And I'm not going to hide it there may be more cookies on the horizon as I'm on a baking binge. I blame cold weather and academic anxiety. We'll just act like Spring isn't around the corner and that bikinis won't have to fit down the road. *cough*

Moving on. One of my former colleagues, Meghan, treated the office to these Bailey’s Chocolate Chip Cookies each year in December. When I first tasted them in 2008 I requested the recipe almost simultaneously as I love Bailey's. It wasn't until Tuesday night that I remembered I had it and decided it was the perfect dessert for Mom to share with the clinic.

These very tender cookies are boozy and sweet. While they are baked you would almost swear their middle is still dough (probably what these dough balls are going for). Their only redeeming value nutritionally is my use of white whole wheat flour...but who cares? They are delicious. Thanks so much the recipe, Meghan! I miss you and many others at the office (and in NYC in general).

Bailey’s Chocolate Chip Cookies
1/2 cup (1 stick) butter
1/2 cup white sugar
1/2 cup brown sugar
1 egg
1 teaspoon vanilla
1/2 cup Bailey’s Irish Cream
2.25 cups cake flour (I used White Whole Wheat; She used All Purpose for hers.)
1/2 tsp. baking soda
1/2 tsp. salt
6 oz. chocolate chips (I used mini-chocolate chips
¾ c coconut flakes (skipped per Meghan's adaptation - why detract from the Bailey's?)
½ c. chopped pecans (skipped see above)

1. Cream butter and sugars until smooth.
2. Add egg, vanilla and Bailey’s; mix well.*
3. Combine flour, baking soda and salt; add to the mixture a little at a time until thoroughly blended. (I added the flour in thirds.)
4. Add chips, etc. Mix.
5. Drop by spoonful onto a greased cookie sheet.**
6. Bake in 375 degrees for 10 – 12 minutes.

*If you are me this is where you add milk to the measuring cup and drink milk with hint of Bailey's. Because you can.
**Using a 1 Tablespoon Scoop my yield was approximately 50 cookies, in spite of eating (plenty of) batter. Meghan's yield was 3 dozen. Presumably because dropping leads to a more traditional cookie shape.  

Thursday, January 27, 2011

Crescent Jam and Cheese Cookies

This past weekend Diana hosted her 7th Annual D.C. Wine & Cheese Soiree. It is always a great opportunity to be classy in cocktail attire while trying new cheeses and wines and catching up with old friends. We used to end it early to go dancing in Adams Morgan but these days we linger at her apartment until late. It is hard to believe I've known Diana and the rest of the "Fab 5 (6-7-8...)" for 7 years. My time in DC is time I cherish more and more as the years go by...

I can't tell you a favorite wine from the night but Stilton with Lemon Peel was my favorite cheese. It was creamy, tangy and a little sweet. I also really enjoyed Deb at Smitten Kitchen's Crescent Jam and Cheese Cookies that Rachel and I made for the party. These cookies are light and flaky on the outside with a subtle sweetness from the jam. The cheese flavor is not prominent, so even your cheese-hating (yes, these people exist) friends will enjoy these cookies.

Just be prepared to work for their deliciousness. Most brutal is pushing Farmer's Cheese through a fine mesh strainer though a closer runner up is cutting the rolled out dough into 3 x 3 squares (especially if you are a bit OCD like me) and then cleaning up the jellied pans! We had a LOT of ooze going on with our cookies as they baked. Clearly my sealing/rolling technique needs some work...and it will get it next time I make these (in a single batch as instructed below rather than a double)!

Crescent Jam and Cheese Cookies
Reworded from Deb at Smitten Kitchen's adaptation of The Gourmet Cookie Book's recipe
Yields approximately 30 cookies

2 sticks (1 cup) Unsalted Butter, softened
7.5 ounces Farmer Cheese
2 tbsp Sour Cream
1/4 teaspoon Vanilla
2 1/4 cups All-Purpose Flour
1/4 teaspoon Salt
Jam (We mixed it up with some marmalade and raspberry.)
1/4 cup Milk
1/2 cup Powdered Sugar

1. Place butter in a large bowl and cream until smooth. Press cheese through a sieve into creamed butter and stir to combine. Add the sour cream and vanilla, stir again. Whisk together 2 cups of the flour and salt in a separate bowl, then add it gradually to the cheese mixture. Wrap the dough in plastic and chill for at least 3 hours (longer is better; you will want it quite firm).
2. Preheat oven to 400°F. Sprinkle your counter with a dusting of flour from the remaining 1/4 cup. Remove the dough from the fridge and cut off 1/4 of it. Return the rest to the fridge, then roll the dough out very thinly on the counter (if you put wax paper on top of it you will prevent the dough from sticking to your rolling pin).
3. Cut the dough into 3-inch squares and put a little less than 1/2 teaspoon jam  in the center of each square. Fold the dough in half on the diagonal, pressing firmly down to seal the two sides around the jam. Roll the triangle into crescents, starting at the wide end. Arrange crescents on a baking sheet (they won’t expand terribly much, so just an inch or so between them is fine) and brush them lightly with milk.
4. Bake the cookies for 15 to 20 minutes, until golden. Transfer them to a wire rack and sift powder sugar over top of them. Continue making cookies in the same manner until all the dough is used.


More Artie Shaw music on iLike

Monday, December 27, 2010

Snow Cream

Our snow is already melting, so it is a good thing I followed through on making snow cream last night. It was light, crunchy and sweet with lots of vanilla flavor. Eating snow cream is like eating a snow cone with superfine ice. Yum.

Snow Cream
5ish cups of clean Snow
1.5 Tsp Vanilla
5 Tbsp Skim Milk
3 Tbsp Sugar

Collect the snow in a large bowl. Drizzle the other components over the top and mix everything together. Taste and add more of anything you'd like to add. Then eat it, quickly before it melts!
All the ingredients lined up in a row.
What I decided the texture of finished snow cream should be.

Mom's improvised cobbler a la mode