Showing posts with label daring bakers. Show all posts

Wednesday, June 27, 2012

Battenberg Cake

Mandy of What The Fruitcake?! came to our rescue last minute to present us with the Battenberg Cake challenge! She highlighted Mary Berry’s techniques and recipes to allow us to create this unique little cake with ease. Our cake had to be "[the traditional shape (square oblong) and had to have at least two different colored checks as well as be covered in a firm edible covering like marzipan.]"

I hadn't seen a Battenberg Cake before this challenge. Its appearance and the long list of directions wowed me (and gave me pause). But I shouldn't have been intimidated. This cake is genuinely easy* to make and doesn't require any special ingredients, outside of the marzipan. Its uniquely thick batter results in a slightly sweetened cake that I thought wasn't sweet enough... Then I added the jam and marzipan and was SO thankful that it hadn't been sweeter since the combination of the three resulted in a major sugar rush!

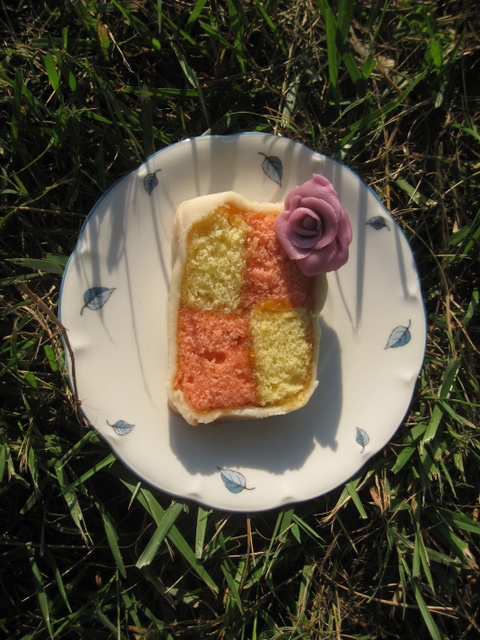
Needless to say we got way more than 8 slices out of this baby...and I have quite the sweet tooth. I'd make Battenberg cake again, though likely with a different base cake recipe as this one was a bit dry for my liking. With a bit more time, and tweezers, I'm confident I could have had a more professional product but this version was perfectly fancy for a family day at the river. Especially after Russell did some marzipan magic and made roses to decorate it. 

For the full skinny from Mandy and photos of some crazy, awesome checkerboard cakes, visit Daring Kitchen. I have placed a slightly adapted recipe below the photos but there is more info to be had. I substituted non-strained local spiced peach preserves for the apricot jam (Thanks to Nancy at Red Dog Farm); otherwise I followed the provided instructions. You could barely taste the peach over the delicious almond/cherry flavor, which I was fine with but beware.

*We'll just ignore my failed attempt at making marzipan. If anyone has ideas for how to use almond flavored sugar/almond meal "sand" let me know. Rescue tips would also be welcome, of course.

I used a plastic knife to make swirls on top of the marzipan. Then I started to fill them in with silver sprinkles. The 90+ degree weather, looming dinner and fumbling fingers quickly killed that idea. Russell's decorative roses saved the day.

 Yep. The sprinkle swirls wouldn't been super classy. Note: This cake doesn't love heat. 
Cake & Cannon


Traditional Battenberg

3/4 cup (1 1/2 sticks) Unsalted Butter, softened & cut in cubes
3/4 cup Caster Sugar
1 1/4 cups Self-Raising Flour
3 Large Eggs, room temp
1/2 cup Almond Flour
3/4 teaspoon Baking Powder
1/2 teaspoon Vanilla Extract
1/4 teaspoon Almond Extract
Pink Food Colouring, neon pink liquid and rose gel

To Finish: 1/3 cup Spiced Peach Preserves and 1 cup / 8 oz Marzipan, natural

Directions:
1. Preheat oven to moderate 350 degrees Farenheit.
2. Grease an 8” square baking tin with butter
3. Line the tin with parchment paper, creating a divide in the middle with the parchment over a folded solid square of foil. (Or prepare Battenberg tin by brushing the tin with melted butter and flouring.)
4. Whisk together the dry ingredients then combine with the wet ingredients in a large bowl and beat together just until the ingredients are combined and the batter is smooth
5. Spoon half the mixture into the one side of the prepared baking tin
6. Add a few drops of red food liquid/gel/paste to the remaining batter, stir until the colour is thoroughly distributed, add more color if needed
7. Spoon the pink batter into the other half of the prepared baking tin
8. Smooth the surface of the batter with a spatula, making sure batter is in each corner
9. Bake for 25 - 30 minutes until the cake is well risen, springs back when lightly touched and a toothpick comes out clean (it should shrink away from the sides of the pan)
10. Leave to cool in the tin for a few minutes before turning out to cool thoroughly on a wire rack
11. Once completely cool, trim the edges of the cake with a long serrated knife. It will look unstable, if it is like mine, but will stand strong!
12. Cut each colored sponge in half lengthways so that you are left with four long strips of sponge.
13. Neaten the strips and trim as necessary so that your checkered pattern is as neat and even as possible
14. Brush jam onto the strips of cake to stick the cake together in a checkered pattern (one yellow next to one pink. On top of that, one pink next to one yellow)
15. Dust a large flat surface with icing sugar then roll the marzipan in an oblong shape that is wide enough to cover the length of the cake and long enough to completely wrap the cake
16. Brush the top of the cake with more jam.
17. Place the cake on the marzipan, jam side down (Either in the middle or to the one side of the marzipan.)
18. Brush the remaining three sides with jam
19. Press the marzipan around the cake, making sure the join is either neatly in the one corner, or will be underneath the cake once turned over.
20. Carefully flip the cake over so that the seam is under the cake and score the top of the cake with a knife, you can also crimp the top corners with your fingers to decorate.
21. Neaten the ends of the cake and remove excess marzipan by trimming off a small bit of cake on both ends to reveal the pattern

Monday, April 30, 2012

Nazook

The Daring Bakers’ April 2012 challenge, hosted by Jason at Daily Candor, were two Armenian standards: nazook and nutmeg cake. Nazook is a layered yeasted dough pastry with a sweet filling, and nutmeg cake is a fragrant, nutty coffee-style cake. Like most hosts, Jason provided background on the recipes and detailed step by step instructions. He also went above and beyond to make instructional videos as well.

I chose to make nazook as it sounded more challenging, I am not crazy about nutmeg and it was Jason's Aunt Aida's recipe. Since, God knows, I didn't need 40 pieces of pastry I halved the recipe. Then I split the filling to make two versions so I could try the traditional vanilla-scented filling and experiment with a brown sugar cinnamon filling inspired by my Mom's favorite Pop-Tarts

I was a bit nervous making it. Nazook was unlike any pastry or yeast recipe I previously made. It had yeast but didn't require proofing, the addition of warm liquid or rising time. The filling involved flour as well as the standard butter/sugar/flavoring combination. But I shouldn't have worried! The resulting pasty had an irresistible buttery, flaky crust with a scent that made me heady.

As for the fillings, I can't tell you which version was better in spite of many side by side tastings... Maybe I'll to decide next time. ;) If you have any suggestions for avoiding the semi-exploded appearance below in the future, please leave them in the comments. 


Nazook
Yields approximately 20 pieces

Pastry dough
1 1/2 cups All-Purpose (Plain) Flour, sifted
1 1/4 teaspoons Active Dry Yeast
1/2 cup Sour Cream
1/2 cup (1 stick) Softened, Unsalted Butter (room temperature)

Vanilla Filling
1/3 cup All-Purpose (Plain) Flour, sifted
1/3 cup Sugar
6 tablespoons Softened, Unsalted Butter (room temperature)
1 teaspoon Vanilla Extract

Brown Sugar Cinnamon Filling
1/3 cup All-Purpose (Plain) Flour, sifted
1/3 cup Brown Sugar
6 tablespoons Softened, Unsalted Butter (room temperature)
1 teaspoon Cinnamon

Wash: 1 Egg Yolk

Directions:

Make the Pastry Dough
1. Place the sifted flour into a large bowl.
2. Add the dry yeast, and mix it in.
3. Add the sour cream, and the softened butter.
4. Use your hands, or a standing mixer with a paddle attachment, to work it into a dough.
5. If using a standing mixer, switch to a dough hook. If making manually, continue to knead for about 10 minutes, or until the dough no longer sticks to the bowl or your hands. If it remains very sticky, add some flour, a little at a time.
6. Cover the dough and refrigerate for 3-5 hours, or overnight if you like.

Make the fillings
7. Mix the flour, brown or white sugar, and the softened butter in a medium bowl.
8. Add the vanilla extract or cinnamon as appropriate.
9. Mix the fillings until they looks like clumpy, damp sand. It should not take long. Set aside.

Make the nazook
10. Preheat the oven to 350 degrees Fahrenheit.
11. Cut the refrigerated dough into two halves.
12. Form one into a ball. Dust your working surface with a little flour.
13. Roll out the dough into a large rectangle or oval. The dough should be thin, but not transparent. I find it helpful to cover the dough with plastic wrap while rolling to prevent it from sticking the rolling pin.
14. Spread one of the filling mixtures across the rolled-out dough in an even layer. To get it started I rolled the filling out on top of the dough and then spread it with my fingers to get it close to the edges on the short sides while keeping about 1 inch of the pastry dough uncovered along the long edges.
15. From one of the long sides, start slowly rolling the dough across. Be careful to make sure the filling stays evenly distributed. Roll all the way across until you have a long, thin loaf.
16. Pat down the loaf with your palm and fingers so that it flattens out a bit (just a bit).
17. Apply your egg yolk wash with a pastry brush.
18. Use your crinkle cutter (or knife) to cut the loaf into 10 equally-sized pieces. Put onto an ungreased cookie sheet (I used a silipat!)
19. Repeat with the other variation or additional portion of the dough and filling. 
19. Place in a preheated moderate oven for about 30 minutes, until the tops are a rich, golden brown.
20. Allow to cool and enjoy.

Tuesday, March 27, 2012

Dutch Crunch Rolls

Sara and Erica of Baking JDs were our March 2012 Daring Baker hostesses! Sara & Erica challenged us to make Dutch Crunch bread, a delicious sandwich bread with a unique, crunchy topping. Sara and Erica also challenged us to create a one of a kind sandwich with our bread! You can read the full challenge here.

I wasn't entirely successful I fear. The Dutch Crunch adhered to the rolls and browned, but it seems to have granules present that others don't appear to have in theirs. Perhaps I didn't beat it vigorously enough? Or I didn't grind the homemade brown rice flour enough? Either way the topping still contributed an interesting texture to the rolls and its flavor was reminiscent of beer bread.

Sadly, I didn't heed the storage instructions and, by the time I remembered I needed a photo of a sandwich,  mold struck rendering the remaining rolls inedible. Heed the storage advice, y'all, and refrigerate the bread if you don't devour it all within a day or two.

I ate my rolls with tuna salad prepared with tuna, mayo, hard boiled eggs, finely chopped celery and Arby's Horsey Sauce; it wasn't photogenic but it tasted good. For my second sandwich, I inverted the buns so the dutch crunch faced the tuna salad. The crunch disappeared but so did the tiny crumbles that made me fret making this change worthwhile. 

While I doubt I'll make Dutch Crunch Rolls or Bread again at home I'll definitely seek out the real thing whenever I make it to San Francisco. I need to experience an expert version to form a real opinion on it.

Soft White Rolls
Yields: approximately 6 rolls

1 tablespoon (1 packet) Active Dry Yeast
1/4 cup Warm Water (105-110º F)
1 cup Warm Milk (105-110º F) (I used skim.)
1 1/2 tablespoons Sugar
2 tablespoons Vegetable Oil (plus additional oil for greasing bowl)
1 1/2 teaspoons Salt
Up to 4 cups All Purpose Flour

1. In the bowl of an electric mixer or large mixing bowl, combine yeast, water, milk and sugar. Stir to dissolve and let sit for about 5 minutes to ensure the yeast proofs (the mixture should bubble or foam and smell yeasty).
2. Add the vegetable oil, salt and 2 cups of flour. Using the dough hook attachment or a wooden spoon, mix at medium speed until the dough comes together.
3. Add remaining flour a quarter cup at time until the dough pulls away from the sides of the bowl.
4. Turn out onto a lightly floured surface and knead for about 4 minutes, until smooth and elastic. (I let the dough hook knead it for another 2 minutes.)
5. Place in a lightly greased bowl, flip once and cover with plastic wrap. Let rise for 1 hour, or until it has at least doubled in size.
6. Then turn it out onto a lightly floured surface and divide it into 6 equal portions to make rolls. Shape each portion, handling it as little as possible, and place on a parchment-lined baking sheet.
7. Cover with plastic wrap and let rise for 15 minutes while you prepare the topping. (or much longer if you're slow like me!) Turn on the oven to preheat to 380 degrees Fahrenheit.
8. Coat the top of each roll with the topping as described above.
9. Place the rolls in the oven on the middle rack for for 25-30 minutes, until well browned. Cool completely on a wire rack, then eat.

Dutch Crunch Topping 
Yield: sufficient for 6-8 rolls

1 tablespoons (2 packets) Active Dry Yeast
.5 cup Warm Water (105-115º F)
1 tablespoons Sugar
1 tablespoons Canola Oil
1/4 teaspoon Salt
3/4 cup Rice Flour (I used brown rice flour made my whirring up brown rice in the Vitamix. Since my flour was home-made I actually used approximately 1 1/2 cups of Rice Flour)

1. Once your bread has almost finished rising, combine all ingredients in a large bowl and beat vigorously with a whisk to combine. The consistency should be like stiff and spreadable, not runny. Add more water or rice flour as needed. Let stand 15 minutes.
2. Coat the top of each loaf or roll with a thick layer of topping. (I patted it out in my hand then placed it on the buns. It was that thick and rumor has it that this is necessary or you won't get the cracked effect.)
3. Let stand, uncovered, for any additional time your recipe recommends. With the Soft White Roll I chose to use we were advised that the rolls could go directly into the oven after applying the topping.
4. When baking, place pans on a rack in the center of the oven and bake your bread as you ordinarily would. The topping should crack and turn a nice golden-brown color.

Wednesday, February 29, 2012

Coconut Banana Bread

The Daring Bakers’ February 2012 host was – Lis! Lisa stepped in last minute and challenged us to create a quick bread we could call our own. She supplied us with a base recipe and shared some recipes she loves from various websites and encouraged us to build upon them and create new flavor profiles. You can find the full challenge and photos of (almost) everyone's quick breads here.

"Quick bread is called just that as it doesn't require kneading or rising time." (Epicurious via Lis) As is one of the few things I manage to prepare quickly and it lets me pass off cake for breakfast, quick bread is definitely one of my favorite things to make. This Coconut Banana Bread is adapted from Orangette's Banana Bread with Chocolate and Cinnamon Sugar, which has been my starting point for banana-based bread since making it in 2007.

That said I always halve the sugar, skip the topping, swap half the unbleached all-purpose flour for whole wheat and add a little salt every time I make it...at the minimum...so it isn't that much like the original. But I still credit Molly for my ongoing obsession with banana bread. This time in addition to the usual changes, I  worked in some coconut, a touch of coconut oil and papaya thinking tropical would taste as good as it would feel in February.

Other than the banana overwhelming the papaya, this Coconut Banana Bread didn't disappoint. It is moist and dense with a subtle sweetness and a touch of a crunch from the coconut. Best of all you can almost feel virtuous eating it as the refined sugar and added fat are minimal and there is plenty of fiber. Temperatures upwards of 70 degrees Fahrenheit might still be a ways away but at least I have this bread to comfort me.

Coconut Banana Bread (with Papaya You Can't Taste :/) 
1 Ripe Banana
1 cup Diced Papaya (I'm pretty sure you could use another banana or two in place of the papaya as its flavor wasn't really present.)
2 Eggs
1 teaspoon Vanilla Extract
1 tablespoon Coconut Oil
1/2 cup Sugar
1/2 teaspoon Salt
1 teaspoon Baking Soda
3/4 cup Unbleached All-Purpose Flour
3/4 cup Whole Wheat Flour
1/2 cup Unsweetened Shredded Coconut (like this reduced fat one that I use)

1. Preheat the oven to 375 degrees Fahrenheit.
2. In a mixing bowl, mash the banana and papaya well with a fork or the back of a spoon. Place the tablespoon of coconut oil in a 9 x 5 loaf pan and melt it in the microwave. Pour it into the bowl and use whatever remains to grease the pan.
3. Add the eggs and vanilla extract to the mixing bowl and stir to combine. Then add the flours, sugar, salt, baking soda and coconut. Stir to mix.
4. Pour the batter into the prepared pan and bake approximately 40 minutes until a toothpick inserted into the center comes out clean. Let cool in the pan on a wire rack until cool to the touch before serving (or it will stick to the bottom of the loaf pan and kind of fall apart...or at least that is how it worked for me after a mere 20 minute holding time.)


Saturday, January 28, 2012

Biscuits and Buffalo Smashed Chickpeas

Audax Artifex was our January 2012 Daring Bakers’ host. Aud worked tirelessly to master light and fluffy scones (a/k/a biscuits) to help us create delicious and perfect batches in our own kitchens! He studied 288 websites' scone/biscuit recipes and the bakers' comments, then made 16 batches to perfect his recipe all  with the goal of "[us being] able to make a good if not great scone (biscuit)."

I don't really need words to tell you he achieved his goal - just look at my biscuits. They were golden, fluffy, and tender. I followed his basic recipe and tips to achieve success that had my Dad on cloud nine on the first try. The directions below tell you what I did for that first batch but I highly recommend checking out the full details of the challenge (and trying it right away). The next batch, also below, involved blue cheese, dill and a bit of whole wheat flour with the white.

I chose those flavors as I wanted to make a variation on Buffalo Chicken Wings with the biscuit toning down the spiciness of the Buffalo-style Smashed Chickpeas. The biscuit tasted pretty good, in spite of being precariously close to burnt, but I'm not giving proportions as it wasn't quite right. The filling, however, was awesomely tangy and addictive so the recipe for that is below. I expect to eat it for lunch often move forward with or without perfected Blue Cheese and Dill biscuits.

I also look forward to making more biscuits in the future...and my Dad looks forward to eating them.

Basic Biscuits (as made in the aforementioned first batch)
Servings: Eight 2-inch scones or five 3-inch scones

1 cup Self Rising Flour (Spoon into your measuring cup and level. Do not pack it.)
1/2 teaspoon Baking Powder
2 tablespoons Frozen, Grated Butter
1/4 cup Skim Milk
1/4 cup Heavy Cream (I didn't have whole milk, but I'm sure that would work instead of this 50/50 mix.)

1. Preheat oven to 475°F.
2. Triple sift the dry ingredients into a large bowl.
3. Rub the frozen grated butter into the dry ingredients until it resembles coarse sand.
4. Add nearly all of the liquid at once into the rubbed-in flour/fat mixture and mix until it just forms a sticky dough (add the remaining liquid if needed).
5. Turn the dough out onto a lightly floured surface, then lightly flour the top of the dough. Knead very gently 4 or 5 times (do not press too firmly) the dough until it is smooth.
6. Pat the dough into a 6 inch by 4 inch rectangle by about 1/2 inch thick. Wrap it in plastic and refrigerate it for ~10 minutes. Then using a well-floured 2-inch biscuit cutter, stamp out without twisting six rounds, gently reform the scraps into another ~1/2 inch layer and cut two more scones.
7. Place the rounds spaced widely apart on a baking sheet. (At this point you can chill them in the fridge for several hours if you aren't ready to bake yet.)
8. Bake in the preheated very hot oven for about 10 minutes (check at 8 minutes) until the scones are well risen and are lightly coloured on the tops. The scones are ready when the sides are set.
9. Immediately place onto cooling rack to stop the cooking process, serve while still warm.


Buffalo Smashed Chickpeas
Servings: 3-4 ... it really depends on how much you eat ... I ate a lot. :x

Inspired by Buffalo Chickpea Lettuce Wraps by Jenn at Jenn's Lifestyle and Menu Blog featured at Kath Eats here and created with reference to Chef Dennis, Food & Wine, Gourmet via Epicurious, and Food.com's Buffalo Chicken wing recipes.

My family doesn't brave the heat too well, so this recipe caters more to the tangy, vinegar flavor of Buffalo Chicken wings and doesn't really need blue cheese to tone down its spice. Feel free to alter the spices to suit your taste. I may give into my urge to add some Sriracha next time.

1 14.5 ounce can Chickpeas, drained and rinsed
1/2 tablespoon Olive Oil
3 cloves Garlic, minced (~1 heaping teaspoon)
1 1/2 tablespoons Apple Cider Vinegar
2 tablespoons Red Pepper Hot Sauce
2 tablespoons Tomato Paste
large pinch Cayenne Pepper
3/4 cup diced Celery

1. Heat olive oil in a medium saucepan over medium heat. Add minced garlic and cook stirring occasionally until it begins to turn golden brown.
2. Add chickpeas and stir.
3. Add vinegar, hot sauce, tomato paste and cayenne. Stir until combined. Using the back of the spatula or spoon to press down the chickpeas to smash some of them.
4. Remove from heat. Stir in the diced celery.


Sunday, July 31, 2011

Blackberry Fraisier, er, Mûrier

Jana of Cherry Tea Cakes was our July Daring Bakers’ host and she challenges us to make Fresh Frasiers inspired by recipes written by Elisabeth M. Prueitt and Chad Robertson in the beautiful cookbook Tartine. We were required to make chiffon cake, pastry cream mousse and simple syrup from scratch; the cake had to feature fruit on its sides and be free standing. You can download the full challenge and recipes here.

Don't be intimidated. I promise this is totally do-able. Making the components requires some advance planning due multiple steps and a 4 hour minimum chill time time, but as long as you pay attention the recipes are manageable! The Fraisier's assembly is by far the hardest part, but even my products' imperfect appearance looks impressive and more importantly it was delicious.

If you like desserts that are fruity, creamy and light on the palate (though not so much on the waist), then a Fraisier is perfect for you. The chiffon cake has a tender texture similar to Angel food cake and soaking it in simple syrup makes it very moist. If you flavor your simple syrup effectively, I'd imagine it also adds an extra flavor dimension. Since my ginger simple syrup wasn't detectable I ended up with blackberry and vanilla for my flavor profile and that was fine with me.

The pastry cream's speedy production really impressed me. It was so quick that when I walked away from the stove after returning the custard to it it clumped (see the picture with an x over it below) and I had to start again. As far as mistakes go this one wasn't so bad; Dad has been quite happy with the leftover lumpy pastry cream. I may make it my go to recipe

Thank you for a cool, sweet, summer challenge, Jana! It was a perfect fit for Virginia's heat wave and berries from the Red Dog Farm.


Basic Chiffon Cake
1 cup and 2 tablespoons All-Purpose Flour
1 teaspoon Baking Powder
3/4 cups Sugar
1/2 teaspoon Salt, preferably Kosher
1/4 cup Vegetable Oil (I used Canola.)
3 large egg yolks
1/3cup and 1 tablespoon Water
1 teaspoon Pure Vanilla Extract
3/4 teaspoon Lemon Zest, grated
5 Large Egg Whites
1/4 teaspoon Cream of Tartar

1. Preheat the oven to 325 degrees Farenheit.
2. Line the bottom of an 8-inch spring form pan with parchment paper. Do not grease the sides of the pan. (I didn't have a springform pan and substituted a 13 x 9 x 2 Pyrex baking dish.)
 3. In a large mixing bowl, stir together the flour and baking powder. Add in all but 3 tablespoons of sugar, and all of the salt. Stir to combine.
4. In a small bowl combine the oil, egg yolks, water, vanilla and lemon zest. Whisk thoroughly.
5. Combine with the dry ingredients and mix thoroughly for about one minute, or until very smooth.
6. Put the egg whites into a stand mixer, and beat on medium speed using a whisk attachment on a medium speed, until frothy. Add cream of tartar and beat on a medium speed until the whites hold soft peaks. Slowly add the remaining sugar and beat on a medium-high speed until the whites hold firm and form shiny peaks.
7. Using a grease free rubber spatula, scoop about 1/3 of the whites into the yolk mixture and fold in gently. Gently fold in the remaining whites just until combined.
8. Pour the batter into the prepared pan. Bake for 45 to 55 minutes or until toothpick inserted into the center comes out clean.
9. Remove the cake from the oven and allow to cool in the pan on a wire rack. (Mine sunk a little. Reading through other Daring Baker's comments it looks like cooling it in the pan upside down helps to avoid sinking.)
10. To unmold, run a knife around the sides to loosen the cake from the pan and remove the spring form sides. Invert the cake and peel off the parchment paper. Refrigerate for up to four days.


Pastry Cream Filling
1 cup Whole Milk
1/2 teaspoon Pure Vanilla Extract
1/8 teaspoon Salt, preferably Kosher
2 tablespoons Cornstarch
1/4 cup Sugar
1 Large Egg
2 tablespoons Unsalted Butter
3/4 teaspoon Gelatin
1/2 tablespoon Water
1 cup Heavy Cream

1. Pour the milk, vanilla, and salt into a heavy sauce pan. Place over medium-high heat and scald, bringing it to a near boiling point. Stir occasionally.
2. Meanwhile, in a stand mixer add the cornstarch and sugar. Whisk to combine
3. Add the eggs to the sugar and cornstarch and whisk until smooth.
4. When the milk is ready, gently and slowly while the stand mixer is whisking, pour the heated milk down the side of the bowl into the egg mixture.
5. Pour the mixture back into the warm pot and continue to cook over a medium heat until the custard is thick, just about to boil and coats the back of a spoon. Do not walk way... This happens quickly!
6. Remove from heat and pass through a fine mesh sieve into a large mixing bowl. Allow to cool for ten minutes stirring occasionally.
7. Cut the butter into four pieces and whisk into the pastry cream a piece at a time until smooth.
8. Cover the cream with plastic wrap, pressing the plastic wrap onto the top of the cream to prevent a skin from forming. Chill in the refrigerator for up to five days.
9. In a small dish, sprinkle the gelatin over the water and let stand for a few minutes to soften.
10. Put two inches (55 mm) of water into a small sauce pan and bring to a simmer over a medium heat.
11. Measure 1/4 cup (2 oz/60 ml) of the chilled pastry cream into a small stainless steel bowl that will sit across the sauce pan with the simmering water, without touching the water.
12. Heat the cream until it is 120 degrees Fahrenheit. Add the gelatin and whisk until smooth. Remove from the water bath, and whisk the remaining cold pastry cream in to incorporate in two batches.
13. In a stand mixer, fitted with the whisk attachment, whip the cream until it holds medium-stiff peaks. Immediately fold the whipped cream into the pastry cream with a rubber spatula.


Simple Syrup
You may choose to flavor the syrup. One way is to use flavored sugar (for example: apple cider sugar, orange sugar, or vanilla sugar) or to stir in 1-2 teaspoons of flavored extract. You may also infuse with herbs or spices, if desired or add four tablespoons of fruit juice or liqueur while the syrup is cooling.

1/3 cup Sugar, flavored or white
(1/4 cup peeled and sliced Ginger)
1/3 cup Water

1. Combine the water and sugar in a medium saucepan.
2. Bring the mixture to a boil and let the sugar dissolve. Stirring is not necessary, but will not harm the syrup.
3. Remove the syrup from the heat and cool slightly.
4. Transfer syrup to a lidded container or jar that can be stored in the refrigerator. Simple syrup can be stored for up to one month.

Fraisier Assembly
Components
1 baked 8 inch Chiffon Cake
1 recipe Pastry Cream Filling
1/3 cup Simple or Flavored Syrup
2 lbs Strawberries
(Traditionally it is covered with almond paste, but I skipped this and used extra pastry cream to "frost" the top of mine.)

1. Line the sides of a 8-inch spring form pan with plastic wrap. Do not line the bottom of the pan.
2. Cut the cake in half horizontally to form two layers.
3. Fit the bottom layer into the prepared spring form pan. Moisten the layer evenly with the simple syrup. When the cake has absorbed enough syrup to resemble a squishy sponge, you have enough.
4. Hull and slice in half enough strawberries to arrange around the sides of the cake pan. Place the cut side of the strawberry against the sides of the pan, point side up forming a ring.
5. Pipe cream in-between strawberries and a thin layer across the top of the cake.
6. Hull and quarter your remaining strawberries and place them in the middle of the cake. Cover the strawberries and entirely with the all but 1 tbsp. of the pastry cream.
7. Place the second cake layer on top and moisten with the simple syrup.
8. Cover with plastic wrap and refrigerate for at least 4 hours. The longer it chills, the more firm the gelatin will become.
9. To serve release the sides of the spring form pan and peel away the plastic wrap.
10. Serve immediately or store in the refrigerator for up to 3 days.

Wednesday, April 27, 2011

Maple Mousse in Carrot Cake Cookie Cups

The April 2011 Daring Bakers’ challenge was hosted by Evelyne of the blog Cheap Ethnic Eatz. Evelyne chose to challenge everyone to make a maple mousse in an edible container. Prizes are being awarded to the most creative edible container and filling, so vote on your favorite from April 27th to May 27th at http://thedaringkitchen.com! You can download all the details and provided recipes here. Thanks for another tasty challenge, Evelyne. Maple Mousse in Carrot Cake Cookie Cups was a big hit with my extended family on Easter.

Evelyne made bacon cups and nut cups for her maple mousse. I created a carrot cake "cookie cup" to hold mine. The cookies are very soft with a nice spice flavor from cinnamon and ginger and a little bit of crunch/chew from the currants and walnuts. They aren't too sweet either, which was a plus since the creamy and delicious maple mousse is pretty darn sweet on its own. I tried three methods to make the "cups" and have detailed each below in the instructions. I recommend making the largest cups as they were the easiest and allowed maximum mousse consumption.

My mousse's texture was slightly bumpy, but I would try the making it again. It tasted light in spite of being anything but with all that whipping cream and the egg yolks! I suspect my problem was the gelatin setting beyond where it should have before I could fold in the whipped cream but only time will tell... As for the cookies, I'll definitely have them again and when I do I'll add a yield for the recipe. They can be baked in a mini-muffin tin for your own Two-Bite Treat a la Whole Foods or served topped with the traditional cream cheese frosting.

Oh and I attempted these carrot curls as toppers but they didn't pan out. Candied carrot crumbles took their place - less pretty but still effective. If you have any technical or other suggestions for me, please pass them along. There is always refining to be done... Have a great day!

Maple Mousse
Yield 6 cups

1 cup Pure Maple Syrup (not maple-flavoured syrup)
4 Large Egg Yolks
1 package/ 1 Tbsp. Unflavored Gelatin
1.5 cups Whipping Cream (35% fat content)

1. Bring maple syrup to a boil then remove from heat. (Choose a saucepan big enough to hold all of the mousse.)
2. Meanwhile, in a large bowl whisk egg yolks. Pour a bit of the heated maple syrup into the egg yolks while whisking (this will temper your egg yolks so they don’t curdle).
3. Add warmed egg yolks to hot maple syrup and whisk until well mixed.
4. Measure 1/4 cup of whipping cream in a bowl and sprinkle it with the gelatine. Let it rest for 5 minutes. Place the bowl in a microwave for 45 seconds (microwave for 10 seconds at a time and check it in between) or place the bowl in a pan of barely simmering water, stir to ensure the gelatine has completely dissolved.
5. Whisk the gelatine/whipping cream mixture into the maple syrup mixture and set aside.
6. Whisk occasionally for approximately an hour or until the mixture has the consistency of an unbeaten raw egg white. (Note: I set a timer and checked at intervals. As of 35 minutes it was the consistency of rubber cement...too hard...but still usable. Keep close watch!)
7. Whip the remaining cream. Stir 1/4 of the whipped cream into the maple syrup mixture. Fold in the remaining cream, transfer to a more fridge-friendly container and refrigerate for at least an hour.
8. Remove from the fridge and divide equally among your edible containers.

Carrot Cake "Cookie Cup"
Improvised using Simplifried's Cookie Template and several Carrot Cake/Cupcake recipes (Orangette, Cooking Light, The Delicious Life, Cupcake Project, Yum Sugar, Deliciously Organic)
Yield TBD

1 stick Unsalted Butter
1/2 cup and 1 tbsp. White Sugar
1/4 cup Brown Sugar
1 Egg, room temperature
1 tsp Vanilla Extract
1 2/3 cups All Purpose Flour
1 tsp Baking Soda
1/2 tsp Salt
2 tsp Cinnamon
1/2 tsp Ginger
1/4 cup Walnuts, chopped
1/2 cup Carrot, grated and drained (or liquid pressed out if you are short on time like me!)
1/4 cup Currants (substitued for raisins per The Cupcake Project's lead)

1. In the bowl of a large mixer combine 1 stick of butter, 1/2 cup and 1 tablespoon of white sugar and 1/4 cup of brown sugar. Mix on high until the butter gets fluffy and turns light yellow. The sugar should all be incorporated. Once this happens add the egg and vanilla extract and continue mixing for 15 seconds.
2. Add the flour, baking soda, cinnamon and ginger. Mix until fully incorporated.
3. Add the walnuts, carrot and currants. Mix until just incorporated.
4. Transfer the dough into plastic wrap or a greased bowl covered in plastic and place it in the freezer for 20 minutes. Preheat the oven to 375 degrees Farenheit.
5a. Lightly oil mini-cupcake tin. Scoop 1 tablespoon of dough into each cupcake form. Bake cookies for 10 minutes*. Grease back of scoop. Remove cookies from oven and immediately press the tops with the scoop/measuring spoon to create an cup-like indention.
5b. Lightly oil upside down mini-cupcake tin. Scoop tablespoon of dough into your lightly oiled hand. Flatten. Lay over the mini-cupcake tin. Bake 10 minutes*. Cool and remove from tin. (I don't recommend this as they often crumbled.)
5c. Lightly oil a regular cupcake tin. Scoop 2 tablespoons of dough into each cupcake form. Bake cookies for 10 minutes*. Grease a shot glass. Remove cookies from oven and immediately press the tops with the shot glass to create a cup-like indentation.
6. Remove to a baking sheet to cool. The mousse will melt if you top them while they are hot.
I haven't tried it but Greenism smooshed her cookie containers into cups halfway through the baking process. That might be even better!

*Or until a toothpick pressed into the center comes out clean.


Courtney, of course, highlighted that Fleet Foxes have a new album coming out and it can be streamed online at NPR, so they seemed like a great band to highlight this post.

Find more artists like FLEET FOXES at Myspace Music

Sunday, March 27, 2011

Coconut Chai Yeasted Meringue Coffee Cake

VCU Men's Basketball WON against Kansas! We are going to the final four! I am so excited. Please join me and cheer us on next Saturday night. Now to something else delightful... 

The March 2011 Daring Baker’s Challenge was hosted by Ria of Ria’s Collection and Jamie of Life’s a Feast. Ria and Jamie challenged The Daring Bakers to bake a yeasted Meringue Coffee Cake. Their full instructions can be found here. Inspired by Ria's use of saffron to flavor the dough and some tea bags I had I came up with Chai Coconut for my flavoring.

As you can see it got a little too brown while I watched VCU beat Purdue last Sunday, the ring didn't match up perfectly and the meringue oozed a little during the second rise, which bothered me wasn't really bad as the ooze was chewy and delicious once baked. I also forgot to put the granulated sugar/cayenne inside so I brushed the outside with the egg wash, sprinkled some on and then brushed with more egg wash. It worked though I will try it the regular way to see what difference it makes to the texture.

Regardless of these little imperfections, I loved the end result. This cake is just sweet enough for a slightly indulgent breakfast and has a fun crunch thanks to the coconut and a kick from the ginger and cayenne. I highly recommend that you make some version of it, if you haven't already. This bread really reminded me of stollen and that is a high compliment as it was one of my favorite Daring Kitchen challenges to date.

Filled Meringue Coffee Cake
Halved to make 1 round coffee cake, approximately 10 inches in diameter.

For the yeast coffee cake dough
2 cups flour
1/8 cup sugar
1/4 and 1/8 teaspoons salt
1 1/8 teaspoons active dried yeast
1/3 cup whole milk
1/8 cup water
1/4 cup unsalted butter, room temperature
1 large egg, room temperature
1 Celestial Seasonings' Decaf Sweet Coconut Chai tea bag

For the meringue
1.5 large egg whites at room temperature (made that happen with Just Whites)
1/8 teaspoon salt
1/4 scant teaspoon vanilla
2 drops coconut extract
1/4 cup sugar

For the filling
1/2 cup Unsweetened Coconut, shredded
1/2 cup Semisweet Chocolate, coarsely chopped
1 HEAPING tablespoon Candied Ginger, Chopped (need to find a better way

Egg wash
1 beaten egg
1 tablespoon granulated sugar
1/8 teaspoon cayenne pepper

Directions

Prepare the dough
1. In a large mixing bowl, combine 3/4 cups of the flour, the sugar, salt and yeast.
2. In a saucepan, combine the milk, water and butter and heat over medium heat until warm and the butter is just melted. Add the Decaf Sweet Coconut Chai tea bag and steep off of the heat for 10 minutes.
3. With an electric mixer on low speed, gradually add the warm liquid to the flour/yeast mixture, beating until well blended. Increase mixer speed to medium and beat 2 minutes. Add the eggs and 1/2 cup flour and beat for 2 more minutes.
4. Add enough of the remaining flour to the mixer and run until the dough holds together (this required almost an additional full cup of flour for me). Switch to the dough hook and knead the dough for approximately 5 minutes until the dough is soft, smooth, sexy and elastic, adding extra flour as needed.
5. Place the dough in a lightly greased bowl, turning to coat all sides. Cover the bowl with plastic wrap and a kitchen towel and let rise until double in bulk, 45 – 60 minutes. The rising time will depend on the type of yeast you use.

Prepare your filling:
1. In a small bowl, combine the cayenne and sugar for the filling if using. Chop chocolate and ginger. Measure out coconut.

Once the dough has doubled, make the meringue:
1. In a clean mixing bowl (plastic or glass) beat the egg whites with the salt, first on low speed for 30 seconds, then increase to high and continue beating until foamy and opaque.
2. Add the vanilla and coconut then start adding the 1/4 cup sugar, a tablespoon at a time as you beat, until very stiff, glossy peaks form.

Assemble the Coffee Cake:
1. Line baking/cookie sheet with parchment paper.
2. Punch down the dough. On a lightly floured surface, roll out the dough into a 20 x 10-inch rectangle. Spread meringue evenly over the rectangle up to about 1/2-inch (3/4 cm) from the edges. Sprinkle your filling of choice evenly over the meringue.
3. Roll up the dough jellyroll style, from the long side. Pinch the seam closed to seal.
4. Very carefully transfer the filled log to the lined cookie sheets, seam side down. Bring the ends of the log around and seal the ends together, forming a ring, tucking one end into the other and pinching to seal.
5. Using kitchen scissors , make cuts along the outside edge at 1-inch intervals. Make them as shallow or as deep as desired but don’t be afraid to cut deep into the ring.
6. Cover the coffee cake with plastic wrap and allow it to rise again for 45 to 60 minutes.
7. Preheat the oven to 350°F.
8. Brush the top of the coffee cake with the egg wash. Bake in the preheated oven for 25 to 30 minutes until risen and golden brown. The dough should sound hollow when tapped.
9. Remove from the oven and slide the parchment paper off the cookie sheet onto the table. Very gently loosen the coffee cake from the paper with a large spatula and carefully slide it onto cooling racks. Allow to cool.
10. Enjoy! These are best eaten fresh, the same day or the next day.


I like to hold the bowl upside down to prove I have reached stiff peaks. It makes for a nice little thrill. 


Find more WIZ KHALIFA songs at Myspace Music

Sunday, February 27, 2011

Vanilla Mint Panna Cotta and Florentine Cookies

The February 2011 Daring Bakers’ challenge was hosted by Mallory from A Sofa in the Kitchen. She chose to challenge everyone to make Panna Cotta from a Giada De Laurentiis recipe and Nestle Florentine Cookies. The panna cotta was luscious and the crispy, sweet florentine cookies irresistible. It was a fun challenge without obscure ingredients or tedious steps. Thank you for hosting, Mallory.

In high school my favorite lip products were Victoria's Secret's Enchanted Pear Roll-On Gloss and Bath & Body Works' Vanilla Mint Lip Balm. They were tasty enough that their application was counterproductive to providing lip moisture as I licked them right off. I also sometimes offered flavor choices to boys I dated prior to kissing. What a catch! Ha. Remembering all this inspired me to flavor my panna cotta Vanilla Mint. The end result tasted more natural than that lip gloss but was still sweet, refreshing and, thanks to the recipe's high fat content, left my lips feeling (temporarily) moist.

The Florentine Cookies' impressive appearance belies the work involved. They can be baking in under 30 minutes and can burn quickly, so keep an eye on them once they are in the oven. The batter looks very wet but the liquid becomes a toffee-like gold. Trust me. Don't add dry ingredients or you will end up with a sad, heavy cookie. I didn't like them as much with chocolate since it overwhelmed the buttery, toffee flavor but feel free to try it. These Oatmeal Lace Cookies from when the Daring Cooks tackled Nut Butters are very similar and also delicious. For either cookie plan to eat them fairly quickly as they soften over time.

You can download Mallory's tips and all the related recipes here. My adjusted version of the panna cotta is below. The texture was good but I had a bit of trouble unmolding it. Maybe next time it will go more smoothly! But I will definitely use greek yogurt or similar in the future to reduce the fat. All that cream overwhelmed me.

Giada's Vanilla Panna Cotta

1 cup whole milk
1 tablespoon (one packet)unflavored powdered gelatin
3 cups whipping cream (30+% butterfat)
1/4 cup agave nectar (this was 1/3 cup honey)
1 tablespoon granulated vanilla sugar
1 teaspoon vanilla bean paste
3 stalks of mint
2 drops peppermint extract
pinch of salt

Directions:
1. Pour the milk into a bowl or pot and sprinkle gelatin evenly and thinly over the milk (make sure the bowl/pot is cold by placing the bowl/pot in the refrigerator for a few minutes before you start making the Panna Cotta). Let stand for 5 minutes to soften the gelatin.
2. Pour the milk into the saucepan/pot and place over medium heat on the stove. Heat this mixture until it is hot, but not boiling, about five minutes. Add three stalks of mint. (I whisk it a few times at this stage).
3. Next, add the cream, honey, sugar, vanilla bean paste, peppermint extract and pinch of salt. Making sure the mixture doesn't boil, continue to heat and stir occasionally until the sugar and honey have dissolved 5-7 minutes.
4. Remove from heat, remove mint stalks, allow it to sit for a few minutes to cool slightly. Then pour into the glass or ramekin.
5. Refrigerate at least 6 hours or overnight. Add garnishes and serve.


Find more artists like Anya Marina at Myspace Music

Sunday, December 26, 2010

December 2010 Daring Bakers' Challenge: Christmas Stollen

Merry (Belated) Christmas! It is a peaceful snowy day here in Virginia and I am taking advantage of it to organize, read, watch movies and maybe venture over to see the Osipenko household. Usually I would bake too but I'm content snacking on the leftover Stollen from Christmas Eve. At least until I make snow cream this evening; my bowl has been collecting flakes since last night for that delicacy. :)

The 2010 December Daring Bakers’ challenge was hosted by Penny of Sweet Sadie’s Baking. She chose to challenge Daring Bakers’ to make Stollen. She adapted a friend’s family recipe and combined it with information from friends, techniques from Peter Reinhart’s book.........and Martha Stewart’s demonstration. You can find all the details and the recipe here.

When Mom heard about the challenge she enthusiastically started reminiscing about her great-grandmother making it on rainy days during her childhood. I was less excited as Stollen's comparison to fruitcake concerned me, but I followed the provided recipe using homemade candied orange peel, dates and cranberries for the fruit and substituting orange for all the lemon. Also! I skipped the rum as we have underage family members. I have to tell you the end result was a pleasant surprise. It looked and tasted great - very moist and tender with a fruity flavor.

This recipe is worth the time and numerous dirty dishes! I will be making it again in loaves. Thank you for a great challenge, Penny.


 The yeast was out of control! I had to get a bowl for the overflow. 


 I love candied citrus peel, so it was shame to have this all go into the bread. Candied 
grapefruit and lime peel and ginger will be next and they will be eaten on their own.


 This was 24" x 17" i.e. HUGE.


Clearly, I am delighted to be cutting the finished product.


You can see the swirled layers and yet it doesn't fall apart when you eat it.

Sunday, October 31, 2010

Chocolate Buttermilk Cake Doughnuts


Happy Halloween! Now on to the belated October Daring Baker's Challenge...

Oh dear. Doughnuts are tough. I grew up loving the sight and meaning of the HOT Krispy Kreme sign in Richmond...fresh glazed doughnuts. Now that I made my own I have a whole new appreciation for doughnuts I can purchase. Leslie compared my chocolate doughnuts to burnt marshmallows, which is a compliment, uh, if you like those. For me it just confirmed the fact that I had a bit of a doughnut disaster for the October 2010 Daring Bakers challenge, which was hosted by Lori of Butter Me Up.

Lori chose to challenge DBers to make doughnuts (obviously) and she made beautiful doughnuts. She used several sources for her recipes including Alton Brown, Nancy Silverton, Kate Neumann and Epicurious. I made the Old Fashioned Buttermilk Cake Doughnuts (page 4) substituting 1/2 cup of flour for cocoa.

They took much longer than the recipe advised - perhaps because I was a novice? Regardless somehow 37 minutes turned into 2 hours. So should you tackle this, leave plenty of time and keep in mind that the dough is VERY, VERY sticky... Only after I added enough flour to make it look like muddy elephant skin did the doughnut holes not stick to the cooking cutter and/or table.

My biggest challenge was regulating the frying oil's temperature. I used 1.5" of canola oil rather than 3," so perhaps that made it more complicated? Either way I have to admit it was fun to watch the dough dip down, bounce up and flip flop all over the place while the holes fried! Somehow in spite of temperature regulation issues the doughnuts weren't greasy though some had doughy centers. 

I can see where these would be delicious and, if you can ignore the slight burnt flavor, mine were rather delicious but in the future I suspect I'll stick to eating other people's fried treats. Frying is messy and wasting all that oil just kills me. The pictured Pumpkin Butter though? I'll take that anytime...more on that later.


Nothing I make will ever compare to Funfetti? Why is it so, so good?!

Monday, September 27, 2010

Decorated Sugar Cookies

The September 2010 Daring Bakers’ challenge was hosted by Mandy of “What the Fruitcake?!” Mandy challenged everyone to make Decorated Sugar Cookies based on recipes from Peggy Porschen and The Joy of Baking and themed September. September means many things to me -- my birthday, work deadlines and the arrival of Fall -- but I decided, perhaps predictably, to focus on TV shows as my theme. While I often mention TV here I follow just a few shows, usually with friends, and our informal viewing "parties" are perfect for distributing eats.

Earlier this month True Blood came to a close (what a bad ending!) and Gossip Girl began in Paris, so I made two sets of themed cookies. The Royal Icing was meant to be a just bitten red only somehow almost a full bottle of red food coloring left it merely mauve and at 2 a.m. I had had enough fooling around with it. The icing was too thick for flooding (oops) but worked well for piping; even if my illustration skills are weak I think the concepts for both are clear! And, yes, there is a cookie that states "Tights are not pants." It is a rule to live by people.

If you need (or want) to decorate sugar cookies, I'd recommend the linked recipes. The cookies are easy to make with a very almond flavor and a nice crunch that somehow turned back into a delicious dough-y texture in the fridge, over a few weeks of post-viewing storage and slowed consumption, and the frosting wasn't bad to put together either. Just recognize when you start the project that there is chilling time for the dough, cooling time the cookies and setting time for the frosting, so starting at 8 p.m. the night before you want to serve them...while also making baguettes, making and canning applebutter (two other never before done projects) and watching Can't Buy Me Love...is not wise.


Posts on the other French-themed food for Gossip Girls' Season Premiere will follow later this week!

Friday, May 28, 2010

Piece Montée a.k.a. Croquembouche

The May 2010 Daring Bakers’ challenge was hosted by Cat of Little Miss Cupcake and it was fantastic. Cat challenged everyone to make a piece montée, or croquembouche, based on recipes from Peter Kump’s Baking School in Manhattan and Nick Malgieri. We were required to make the pate a choux, the crème patissiere, and the glaze used to mount/decorate it. I had contemplated this project since encountering one at a lavish wedding a few years ago and had chickened out, so it was great to be faced with it.

My pate a choux wasn't the smoothest but it all puffed. I marveled at the fact you could smooth out the batter with a wet finger without creating a mess. I always thought pate a choux was a temperamental thing to make...apparently not! I also was thrilled that my pastry cream once again was smooth. The cornstarch sped up the thickening process but left hint of flavor. In the future I will probably stick to the pastry cream recipe from making Tiramisu as I didn't particularly enjoy the taste/texture of cornstarch. I ended up mixing most of the pastry cream with homemade marmalade, which still stuns me in its simplicity and flavor. For this batch of marmalade, I added 2 tablespoons of ginger to the last three minutes of the third blanching and more vanilla bean paste for some punch. It made the cream reminiscent of a creamsicle. Yum.

Piping the cream into the puffs was a challenge... I didn't have a good feel for when they were full and one exploded like an overstuffed Pacman (see below). Caramel is risky and mine probably could've been a little less done but it was still tasty. The main issue was the HEAT and required speed when assembling the tower. Dealing with those aspects will definitely require some work but I think I'm up for the challenge once the weather cools off again.  

This probably sounds crazy but other than the difficulty of assembling the tower, I found this challenge much easier than expected. I'm unsure if it was pure luck, really good recipe selections or my growth as a baker but I was very happy with my result, especially for a first try. I did everything over the course of 2-3 nights without any real difficulties. The result was the perfect treat for Gossip Girl's season finale, especially as some of the characters left for a Parisian summer. Thanks to Cat for a great challenge and to Meg for sharing the treat and show.

Detailed instructions and the recipes can be found here.